This article is currently in the process of being translated into Japanese (~15% done).
Creating a custom input dialog
最後の2つの記事では WPF 組み込みのダイアログの使い方を見てきましたが、独自のダイアログ作成も同じように簡単です。実際、あなたは必要なコントロールを配置したウィンドウを作成し、表示する必要があります。
しかし、他のウィンドウズアプリケーションと同じような動作をさせるために覚えておくべき事がいくつかあります。この記事では、あなたがやるべきいろいろな練習について議論するために、ユーザーに質問して答えを返す簡単なダイアログを作成します。
ダイアログの設計
この特別なダイアログでは、ユーザーに我々がどんな情報が必要かを問うためのラベルと、答えを入力するテキストボックスと通常のOKとキャンセルボタンだけが必要です。見栄えのためにアイコンも加えることにしました。その結果がこれです。

そして、これがダイアログのコードです。
<Window x:Class="WpfTutorialSamples.Dialogs.InputDialogSample"
        xmlns="http://schemas.microsoft.com/winfx/2006/xaml/presentation"
        xmlns:x="http://schemas.microsoft.com/winfx/2006/xaml"
        Title="Input" SizeToContent="WidthAndHeight" WindowStartupLocation="CenterScreen"
        ContentRendered="Window_ContentRendered">
    <Grid Margin="15">
        <Grid.ColumnDefinitions>
            <ColumnDefinition Width="Auto" />
            <ColumnDefinition Width="*" />
        </Grid.ColumnDefinitions>
        <Grid.RowDefinitions>
            <RowDefinition Height="Auto" />
            <RowDefinition Height="Auto" />
            <RowDefinition Height="Auto" />
        </Grid.RowDefinitions>

        <Image Source="/WpfTutorialSamples;component/Images/question32.png" Width="32" Height="32" Grid.RowSpan="2" Margin="20,0" />

        <Label Name="lblQuestion" Grid.Column="1">Question:</Label>
        <TextBox Name="txtAnswer" Grid.Column="1" Grid.Row="1" MinWidth="250">Answer</TextBox>

        <WrapPanel Grid.Row="2" Grid.ColumnSpan="2" HorizontalAlignment="Right" Margin="0,15,0,0">
            <Button IsDefault="True" Name="btnDialogOk" Click="btnDialogOk_Click" MinWidth="60" Margin="0,0,10,0">_Ok</Button>
            <Button IsCancel="True" MinWidth="60">_Cancel</Button>
        </WrapPanel>
    </Grid>
</Window>
using System;
using System.Windows;
namespace WpfTutorialSamples.Dialogs
{
public partial class InputDialogSample : Window
{
public InputDialogSample(string question, string defaultAnswer = "")
{
InitializeComponent();
lblQuestion.Content = question;
txtAnswer.Text = defaultAnswer;
}
private void btnDialogOk_Click(object sender, RoutedEventArgs e)
{
this.DialogResult = true;
}
private void Window_ContentRendered(object sender, EventArgs e)
{
txtAnswer.SelectAll();
txtAnswer.Focus();
}
public string Answer
{
get { return txtAnswer.Text; }
}
}
}このコードはとても簡単です。しかし、特別に注意するべき点があります。
XAML
XAML ではコントロールを配置するためにGridを使いました。これは特別なことではありません。ウィンドウのWidthとHeightプロパティを省略し、代わりに自動リサイズを設定してコンテンツにウィンドウの大きさを合わせています。見栄えの良いダイアログを作るために、この方法でサイズの微調整を省略できます。マージンと最小サイズを使ってリサイズに対応します。
変更した他のウィンドウプロパティは WindowStartupLocation です。この例のようなダイアログや多くの非メインウインドウでは、 Windowsによって決められるダイアログの最初の表示位置を変更するために、この値を CenterScreen か CenterOwner に変更すべきです。ただし Top と Left プロパティで表示位置を明示している場合は除きます。
また、 IsCancel と IsDefault という、ダイアログのボタンに関する2つのプロパティには特に注意しなければなりません。IsCancel は、ユーザーがこのボタンを押したときに DialogResult に false をセットしてウィンドウを閉じることを意味します。このプロパティを付けたボタンは、ユーザーが Esc キーを押してウィンドウを閉じることができることを保証するため、Windowsダイアログの中で常に押下可能にすべきです。
この IsDefault プロパティはOKボタンにフォーカスをあて、さらに、ユーザーがEnterキーを押した時には、このボタンの処理を走らせるようにします。後で説明するように、DialogResult にセットするイベントハンドラーが必要です。
コードビハインド
コードビハインドでは、コンストラクタを変更し、2つのパラメータを持たせるようにします(そのうち1つは任意にします)。これで、質問と(もし渡されていたら)デフォルトの答えを、デザイナで作成したUIのコントロールにセットすることができます。
ダイアログの呼び出し元にユーザが入力したことを伝えるために、OKボタンにはクリックされたときに、このウィンドウの DialogResult に true をセットするイベントハンドラーがあります。キャンセルボタンにはイベントハンドラーはありません。なぜなら、すでに説明した通り 、 IsCancel プロパティをtrueに設定しているときはWPFがこれを処理するためです。
To give focus to the TextBox upon showing the dialog, I've subscribed to the ContentRendered event, where I select all the text in the control and then give focus. If I just wanted to give focus, I could have use the FocusManager.FocusedElement attached property on the Window, but in this case, I also want to select the text, to allow the user to instantly overwrite the answer provided by default (if any).
A last detail is the Answer property which I've implemented. It simply gives access to the entered value of the TextBox control, but it's good practice to provide a property with the return value(s) of the dialog, instead of directly accessing controls from outside the window. This also allows you to influence the return value before returning it, if needed.
ダイアログの使い方
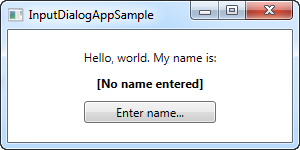
With all the above in place, we're now ready to actually use our dialog. It's a very simple task, so I've created a small application for testing it. Here's the code:
<Window x:Class="WpfTutorialSamples.Dialogs.InputDialogAppSample"
        xmlns="http://schemas.microsoft.com/winfx/2006/xaml/presentation"
        xmlns:x="http://schemas.microsoft.com/winfx/2006/xaml"
        Title="InputDialogAppSample" Height="150" Width="300">
    <StackPanel HorizontalAlignment="Center" VerticalAlignment="Center">
        <TextBlock>Hello, world. My name is:</TextBlock>
        <TextBlock Name="lblName" Margin="0,10" TextAlignment="Center" FontWeight="Bold">[No name entered]</TextBlock>
        <Button Name="btnEnterName" Click="btnEnterName_Click">Enter name...</Button>
    </StackPanel>
</Window>
using System;
using System.Windows;
namespace WpfTutorialSamples.Dialogs
{
public partial class InputDialogAppSample : Window
{
public InputDialogAppSample()
{
InitializeComponent();
}
private void btnEnterName_Click(object sender, RoutedEventArgs e)
{
InputDialogSample inputDialog = new InputDialogSample("Please enter your name:", "John Doe");
if(inputDialog.ShowDialog() == true)
lblName.Text = inputDialog.Answer;
}
}
}
There's nothing special to it - just a couple of TextBlock controls and a Button for invoking the dialog. In the Click event handler, we instantiate the InputDialogSample window, providing a question and a default answer, and then we use the ShowDialog() method to show it - you should always use ShowDialog() method and not just Show() for a modal dialog like this.
If the result of the dialog is true, meaning that the user has activated the Ok button either by clicking it or pressing Enter, the result is assigned to the name Label. That's all there is to it!