This article has been localized into Chinese by the community.
创建自定义输入对话框
在最后几篇文章中,我们研究了使用WPF的内置对话框,但创建自己的对话框几乎同样容易。实际上,您只需要创建一个Window,将所需的控件放在其中然后显示它。
不过,在创建对话框时你应该记住一些事项,以确保你的应用程序能像其他Windows应用程序一样运行。 在本文中,我们将创建一个非常简单的对话框用来询问用户一个问题然后返回答案,同时讨论你应该遵循的各种良好实践。
设计对话框
对于这个具体的对话框,我只需要提供一个Label(标签)告诉用户我们需要什么信息,一个TextBox(文本框)用来输入对应的答案,然后就是常用的Ok和Cancel按钮。 我决定在对话框中添加一个图标,使得界面更美观。 最后呈现如下效果:

对话框的源代码:
<Window x:Class="WpfTutorialSamples.Dialogs.InputDialogSample"
        xmlns="http://schemas.microsoft.com/winfx/2006/xaml/presentation"
        xmlns:x="http://schemas.microsoft.com/winfx/2006/xaml"
        Title="Input" SizeToContent="WidthAndHeight" WindowStartupLocation="CenterScreen"
        ContentRendered="Window_ContentRendered">
    <Grid Margin="15">
        <Grid.ColumnDefinitions>
            <ColumnDefinition Width="Auto" />
            <ColumnDefinition Width="*" />
        </Grid.ColumnDefinitions>
        <Grid.RowDefinitions>
            <RowDefinition Height="Auto" />
            <RowDefinition Height="Auto" />
            <RowDefinition Height="Auto" />
        </Grid.RowDefinitions>

        <Image Source="/WpfTutorialSamples;component/Images/question32.png" Width="32" Height="32" Grid.RowSpan="2" Margin="20,0" />

        <Label Name="lblQuestion" Grid.Column="1">Question:</Label>
        <TextBox Name="txtAnswer" Grid.Column="1" Grid.Row="1" MinWidth="250">Answer</TextBox>

        <WrapPanel Grid.Row="2" Grid.ColumnSpan="2" HorizontalAlignment="Right" Margin="0,15,0,0">
            <Button IsDefault="True" Name="btnDialogOk" Click="btnDialogOk_Click" MinWidth="60" Margin="0,0,10,0">_Ok</Button>
            <Button IsCancel="True" MinWidth="60">_Cancel</Button>
        </WrapPanel>
    </Grid>
</Window>
using System;
using System.Windows;
namespace WpfTutorialSamples.Dialogs
{
public partial class InputDialogSample : Window
{
public InputDialogSample(string question, string defaultAnswer = "")
{
InitializeComponent();
lblQuestion.Content = question;
txtAnswer.Text = defaultAnswer;
}
private void btnDialogOk_Click(object sender, RoutedEventArgs e)
{
this.DialogResult = true;
}
private void Window_ContentRendered(object sender, EventArgs e)
{
txtAnswer.SelectAll();
txtAnswer.Focus();
}
public string Answer
{
get { return txtAnswer.Text; }
}
}
}代码很简单,但是以下事项你应该特别注意:
XAML
在XAML部分中,我使用了Grid来控制控件的布局 - 这没什么特别的。 我删除了窗口的宽度和高度属性,而是将其设置为自动调整大小以匹配内容 - 这在对话框中是有意义的,因此您不必微调大小以使一切看起来都正常。 相反,使用边距和最小尺寸来确保看起来像您希望的那样,同时仍然允许用户调整对话框的大小。
我在Window上更改的另一个属性是WindowStartupLocation。 对于这样的对话框,可能对于大多数其他非主窗口,您应该将此值更改为CenterScreen或CenterOwner,以更改窗口将出现在Windows决定的位置的默认行为,除非您手动指定它的Top和Left属性。
还要特别注意我在对话框按钮上使用的两个属性:IsCancel和IsDefault。 IsCancel告诉WPF,如果用户单击此按钮,则Window的DialogResult应设置为false,这也将关闭窗口。 用户也可以按下键盘上的Esc键来关闭窗口,这在Windows对话框中是非常合适的。
IsDefault属性将焦点放在Ok按钮上,如果用户按下键盘上的Enter键,则会激活此按钮。 但是,如下所述,需要在事件处理程序设置DialogResult。
后台代码
在后台代码中,我给构造函数添加了两个参数,其中一个是可选的。 这允许我们将问题和默认答案(如果提供)放入指定的UI控件中。
Ok按钮有一个事件处理程序,可确保在单击时将Window的DialogResult属性设置为true,向对话框的发起者返回用户的输入值。 我们没有处理取消按钮,因为当我们将IsCancel属性设置为true时,WPF会为我们处理这个,如上所述。
为了在显示对话框时将焦点放在TextBox上,我订阅了ContentRendered事件,我在其中选择控件中的所有文本然后给予焦点。 如果我只是想给焦点,我可以使用Window上的FocusManager.FocusedElement附加属性,但在这种情况下,我还想选择文本,以允许用户立即覆盖默认提供的答案(如果有的话)。
最后一个细节是我实现的Answer属性。 它只是允许访问TextBox控件的输入值,最好提供一个带有对话框返回值的属性,而不是直接从窗口外部访问控件。 如果需要,这样做您可以在返回之前修改返回值。
使用这个对话框
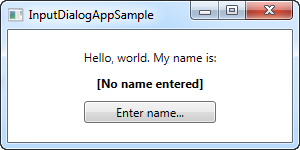
有了上述所有功能,我们现在可以实际使用对话框。 这是一个非常简单的任务,所以我创建了一个小应用程序来测试它。 这是代码:
<Window x:Class="WpfTutorialSamples.Dialogs.InputDialogAppSample"
        xmlns="http://schemas.microsoft.com/winfx/2006/xaml/presentation"
        xmlns:x="http://schemas.microsoft.com/winfx/2006/xaml"
        Title="InputDialogAppSample" Height="150" Width="300">
    <StackPanel HorizontalAlignment="Center" VerticalAlignment="Center">
        <TextBlock>Hello, world. My name is:</TextBlock>
        <TextBlock Name="lblName" Margin="0,10" TextAlignment="Center" FontWeight="Bold">[No name entered]</TextBlock>
        <Button Name="btnEnterName" Click="btnEnterName_Click">Enter name...</Button>
    </StackPanel>
</Window>
using System;
using System.Windows;
namespace WpfTutorialSamples.Dialogs
{
public partial class InputDialogAppSample : Window
{
public InputDialogAppSample()
{
InitializeComponent();
}
private void btnEnterName_Click(object sender, RoutedEventArgs e)
{
InputDialogSample inputDialog = new InputDialogSample("Please enter your name:", "John Doe");
if(inputDialog.ShowDialog() == true)
lblName.Text = inputDialog.Answer;
}
}
}
没有什么特别之处 - 只有几个TextBlock控件和一个用于调用对话框的Button。 在Click事件处理程序中,我们实例化InputDialogSample窗口,提供问题和默认答案,然后我们使用ShowDialog()方法来显示它 - 你应该使用ShowDialog()方法而不是Show()用于模态对话。
如果对话框的返回值为true,表示用户通过单击或按Enter键激活了Ok按钮,结果将分配给名称Label。 这就是它的全部了!