This article is currently in the process of being translated into Korean (~92% done).
The FlowDocumentScrollViewer control
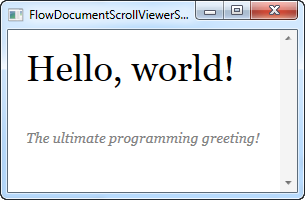
소개에서 논의된 FlowDocument wrapper의 범위에서 FlowDocumentScrollViewer는 가장 간단한 것입니다. 이 뷰어는 사용자에게 일반 스크롤 막대를 사용하여 긴 문서로 스크롤 할 수 있게합니다. FlowDocument와 관련한 첫 번째 시작이기 때문에 기본적으로 사용되는 "Hello World!"로 시작하겠습니다. 이 본문에서는 FlowDocumentScrollViewer를 사용하는 것 외에도 모든 wrapper 간에 공통적인 몇 가지 개념을 다룹니다. 다음은 첫 번째 예입니다.
<Window x:Class="WpfTutorialSamples.Rich_text_controls.FlowDocumentScrollViewerSample"
        xmlns="http://schemas.microsoft.com/winfx/2006/xaml/presentation"
        xmlns:x="http://schemas.microsoft.com/winfx/2006/xaml"
        Title="FlowDocumentScrollViewerSample" Height="200" Width="300">
    <Grid>
        <FlowDocumentScrollViewer>
            <FlowDocument>
                <Paragraph FontSize="36">Hello, world!</Paragraph>
                <Paragraph FontStyle="Italic" TextAlignment="Left" FontSize="14" Foreground="Gray">The ultimate programming greeting!</Paragraph>
            </FlowDocument>
        </FlowDocumentScrollViewer>
    </Grid>
</Window>
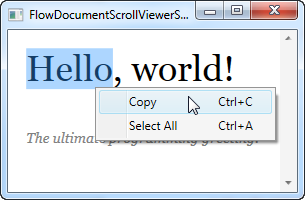
간단한 마크업 태크를 이용하여(이 경우 Paragraph 태그) 텍스트를 지정하는 것이 이렇게 쉽습니다. 이것은 몇 가지 TextBlock 컨트롤을 이용한 구현도 가능할 것이라 생각할 것인데 사실 맞습니다. 하지만 이러한 매우 기본적인 예제에서도 비용의 추가 없이 추가적인 기능을 사용할 수 있습니다. 텍스트를 선택하고 그것을 클립보드에 복사합니다. 그러면 아래와 같은 모습이 됩니다.

Zooming and scrollbar visibility
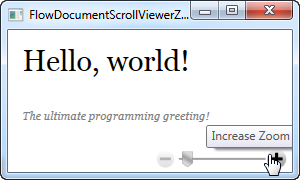
이전에 언급했듯이 모든 FlowDocument wrapper는 상작의 축소를 지원합니다. 위의 예에서 Ctrl 키를 누른 상태에서 마우스 휠을 사용하여 확대 및 축소할 수 있습니다. 이것은 엔드 유저에게 명확하지 않을 수 있으므로 확대/축소 수준을 변경할 수 있는 컨트롤이 있는 FlowDocumentScrollViewer의 기본 제공 도구 모음을 표시하여 도움을 줄 수 있습니다. FlowDocumentScrollViewer에서 IsToolBarVisible 속성을 true로 설정하기만 하면 다음 예제에서 볼 수 있는 것처럼 작업이 완료됩니다.
<Window x:Class="WpfTutorialSamples.Rich_text_controls.FlowDocumentScrollViewerZoomSample"
        xmlns="http://schemas.microsoft.com/winfx/2006/xaml/presentation"
        xmlns:x="http://schemas.microsoft.com/winfx/2006/xaml"
        Title="FlowDocumentScrollViewerZoomSample" Height="180" Width="300">
    <Grid>
        <FlowDocumentScrollViewer IsToolBarVisible="True" Zoom="80" ScrollViewer.VerticalScrollBarVisibility="Auto">
            <FlowDocument>
                <Paragraph FontSize="36">Hello, world!</Paragraph>
                <Paragraph FontStyle="Italic" TextAlignment="Left" FontSize="14" Foreground="Gray">The ultimate programming greeting!</Paragraph>
            </FlowDocument>
        </FlowDocumentScrollViewer>
    </Grid>
</Window>
이제 사용자는 문서 아래의 도구 모음에 있는 슬라이더와 버튼을 사용하여 확대/축소 수준을 제어할 수 있습니다. Zoom 속성을 사용하여 기본 확대/축소 수준을 변경하였음에 주목하세요. 확대/축소 수준을 백분율로 정의하므로 이 경우 텍스트는 기본 값인 80%로 축소됩니다.
첫 번째 예제와 비교하여 이 예제에서 마지막으로 변경한 것은 ScrollViewer.VerticalScrollBarVisibility 속성의 사용입니다. Auto으로 설정하면 콘텐츠가 실제로 사용 가능한 공간(일반적으로 의도한 것)을 초과할 때까지 스크롤 바가 보이지 않습니다.
Text alignment
위의 예에서 TextAlignment 속성을 의도적으로 사용했다는 것을 눈치채셨을 것입니다. 이는 WPF FlowDocument에서 기본적으로 텍스트가 정렬되어 렌더링되기 때문에 필요한 경우 텍스트의 각 줄이 사용 가능한 전체 너비를 포함하도록 늘어납니다.
하지만 정렬된 텍스트의 사용은 대부분 상식적으로 사용되지만 매우 긴 단어 바로 앞에 줄바꿈을 사용하는 경우 줄에 매우 긴 공백을 남길 수 있는 매우 좋지 않은 레이아웃을 보여주기도 합니다.
다음 예는 이러한 문제를 해결하는 데 도움이 되는 솔루션과 설명입니다. IsOptimalParagraphEnabled속성을 IsHyphenationEnabled속성과 함께 사용하면 WPF에서 텍스트 레이아웃 표시에서 최상의 결과를 얻을 수 있습니다.
IsOptimalParagraphEnabled를 사용하면 WPF는 먼저 텍스트의 앞 공간이 부족한 지 혹은 다른 위치에서 텍스트를 나누는 것이 더 합리적인지 확인합니다. IsHyphenationEnabled 를 사용하면 텍스트를 보다 자연스럽게 레이아웃할 수 있도록 WPF에서 단어를 하이픈으로 분할 하게 됩니다.
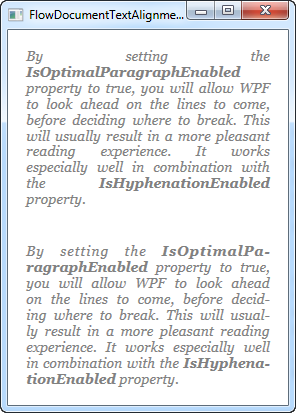
다음 예에서는 동일한 텍스트를 두 번 렌더링 하였습니다. 속성이 없는 경우와 속성이 있는 경우입니다. 차이점은 매우 분명합니다.
<Window x:Class="WpfTutorialSamples.Rich_text_controls.FlowDocumentTextAlignmentSample"
        xmlns="http://schemas.microsoft.com/winfx/2006/xaml/presentation"
        xmlns:x="http://schemas.microsoft.com/winfx/2006/xaml"
        Title="FlowDocumentTextAlignmentSample" Height="400" Width="330">
    <StackPanel>
        <FlowDocumentScrollViewer ScrollViewer.VerticalScrollBarVisibility="Auto">
            <FlowDocument>
                <Paragraph FontStyle="Italic" FontSize="14" Foreground="Gray">
                    By setting the
                    <Bold>IsOptimalParagraphEnabled</Bold> property to true,
                    you will allow WPF to look ahead on the lines to come, before deciding
                    where to break. This will usually result in a more pleasant reading
                    experience. It works especially well in combination with the
                    <Bold>IsHyphenationEnabled</Bold> property.
                </Paragraph>
            </FlowDocument>
        </FlowDocumentScrollViewer>
        <FlowDocumentScrollViewer ScrollViewer.VerticalScrollBarVisibility="Auto">
            <FlowDocument IsOptimalParagraphEnabled="True" IsHyphenationEnabled="True">
                <Paragraph FontStyle="Italic" FontSize="14" Foreground="Gray">
                    By setting the <Bold>IsOptimalParagraphEnabled</Bold> property to true,
                    you will allow WPF to look ahead on the lines to come, before deciding
                    where to break. This will usually result in a more pleasant reading
                    experience. It works especially well in combination with the
                    <Bold>IsHyphenationEnabled</Bold> property.
                </Paragraph>
            </FlowDocument>
        </FlowDocumentScrollViewer>
    </StackPanel>
</Window>
창의 크기가 자주 조정되는 경우 텍스트를 렌더링할 때 약간 더 많은 CPU 전력이 필요하기 때문에 IsOptimalParagraphEnabled는 기본적으로 활성화되지 않습니다. 대부분 이것은 문제가 되지 않습니다.
응용 프로그램에 FlowDocument 인스턴스가 많고 최적의 렌더링 방법을 선호하는 경우 App.xaml에서 이를 활성화하는 전역 스타일을 지정하여 모든 FlowDocument 인스턴스에서 활성화할 수 있습니다. 아래가 바로 그 예입니다.
<Application x:Class="WpfTutorialSamples.App"
             xmlns="http://schemas.microsoft.com/winfx/2006/xaml/presentation"
             xmlns:x="http://schemas.microsoft.com/winfx/2006/xaml"
             xmlns:sys="clr-namespace:System;assembly=mscorlib"
             StartupUri="Rich text controls/FlowDocumentTextAlignmentSample.xaml">
    <Application.Resources>
        <Style TargetType="FlowDocument">
            <Setter Property="IsOptimalParagraphEnabled" Value="True" />
            <Setter Property="IsHyphenationEnabled" Value="True" />
        </Style>
    </Application.Resources>
</Application>