This article is currently in the process of being translated into Korean (~93% done).
The WPF ContextMenu
팝업 매뉴라고도 불리우는 콘택스트 매뉴는 특정한 유저의 행동에 따라 표시되는 매뉴입니다. 대개 특정한 창 혹은 컨트롤에 마우스 오른쪽 클릭을 하였을 때 사용됩니다. 콘택스트 매뉴는 하나에 컨트롤 안에서 관련된 기능들을 제안하기 위해서 사용됩니다.
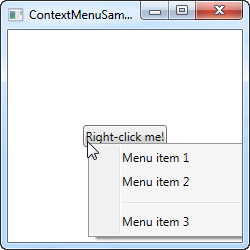
WPF는 특정한 컨트롤에 거의 묶여있다시피 한 ContextMenu 컨트롤과 함께 사용되며 많은 경우에 당신도 이 방법을 사용하여 인터페이스에 추가할 것입니다. 이것은 모든 컨트롤이 노출하는 ContextProperty (거의 모든 WPF 컨트롤이 상속하는 FrameworkElement에서 옵니다.)를 통해 행하여집니다. 다음 예시로 어떻게 작동하는지 확인하세요:
<Window x:Class="WpfTutorialSamples.Common_interface_controls.ContextMenuSample"
        xmlns="http://schemas.microsoft.com/winfx/2006/xaml/presentation"
        xmlns:x="http://schemas.microsoft.com/winfx/2006/xaml"
        Title="ContextMenuSample" Height="250" Width="250">
    <Grid>
        <Button Content="Right-click me!" VerticalAlignment="Center" HorizontalAlignment="Center">
            <Button.ContextMenu>
                <ContextMenu>
                    <MenuItem Header="Menu item 1" />
                    <MenuItem Header="Menu item 2" />
                    <Separator />
                    <MenuItem Header="Menu item 3" />
                </ContextMenu>
            </Button.ContextMenu>
        </Button>
    </Grid>
</Window>
만약 당신이 이미 일반적인 메뉴에 대한 챕터를 읽었다면, 일반적인 매뉴와 ContextMenu는 정확하게 같은 방식으로 작동한다는 것으르 알아챘을 것입니다. 이것은 이 둘 모두 MenuBase 클래스를 상속하기 때문입니다. 일반 매뉴 사용법에서 보았던 예시들처럼, 당연하게도 유저가 이것들을 클릭하였을때의 작동을 설정하기 위한 클릭 이벤트를 추가할 수 있습니다. 하지만 WPF에 더욱 적절한 방법은 Commands를 사용하는 것입니다.
ContextMenu with Commands and icons
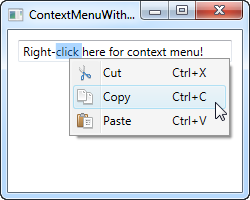
다음 예제에서는 Context Menu를 사용할 때 두 가지 주요 개념을 보여드리겠습니다: WPF Command의 사용은 더 많은 것을 제공합니다. 클릭 이벤트 핸들러, 텍스트 및 바로 가기 텍스트를 포함한 기능을 Command 속성에 할당하기만 하면 됩니다. 상황에 맞는 메뉴 항목에 아이콘 사용을 보여드리겠습니다.
<Window x:Class="WpfTutorialSamples.Common_interface_controls.ContextMenuWithCommandsSample"
        xmlns="http://schemas.microsoft.com/winfx/2006/xaml/presentation"
        xmlns:x="http://schemas.microsoft.com/winfx/2006/xaml"
        Title="ContextMenuWithCommandsSample" Height="200" Width="250">
    <StackPanel Margin="10">
        <TextBox Text="Right-click here for context menu!">
            <TextBox.ContextMenu>
                <ContextMenu>
                    <MenuItem Command="Cut">
                        <MenuItem.Icon>
                            <Image Source="/WpfTutorialSamples;component/Images/cut.png" />
                        </MenuItem.Icon>
                    </MenuItem>
                    <MenuItem Command="Copy">
                        <MenuItem.Icon>
                            <Image Source="/WpfTutorialSamples;component/Images/copy.png" />
                        </MenuItem.Icon>
                    </MenuItem>
                    <MenuItem Command="Paste">
                        <MenuItem.Icon>
                            <Image Source="/WpfTutorialSamples;component/Images/paste.png" />
                        </MenuItem.Icon>
                    </MenuItem>
                </ContextMenu>
            </TextBox.ContextMenu>
        </TextBox>
    </StackPanel>
</Window>
예제를 실행해 보고 항목에 명령을 할당하여 얼마나 많은 기능을 자유롭게 사용할 수 있는지 직접 확인하십시오. 또한 ContextMenu의 메뉴 항목에 있는 아이콘을 사용하는 것도 매우 간단합니다.
Invoke ContextMenu from Code-behind
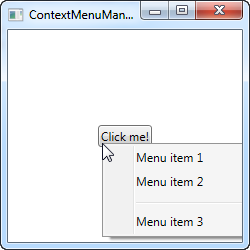
지금까지 ContextMenu는 해당 컨트롤이 속한 컨트롤을 마우스 오른쪽 버튼으로 클릭할 때 호출되었습니다. WPF는 ContextMenu 속성 할당 시 자동으로 이 작업을 수행합니다. 그러나 경우에 따라 코드에서 수동으로 호출해야 할 수도 있습니다. 이 작업은 매우 쉬우므로 첫 번째 예제를 다시 사용하여 다음과 같이 시연해 보겠습니다.
<Window x:Class="WpfTutorialSamples.Common_interface_controls.ContextMenuManuallyInvokedSample"
        xmlns="http://schemas.microsoft.com/winfx/2006/xaml/presentation"
        xmlns:x="http://schemas.microsoft.com/winfx/2006/xaml"
        Title="ContextMenuManuallyInvokedSample" Height="250" Width="250">
    <Window.Resources>
        <ContextMenu x:Key="cmButton">
            <MenuItem Header="Menu item 1" />
            <MenuItem Header="Menu item 2" />
            <Separator />
            <MenuItem Header="Menu item 3" />
        </ContextMenu>
    </Window.Resources>
    <Grid>
        <Button Content="Click me!" VerticalAlignment="Center" HorizontalAlignment="Center" Click="Button_Click" />
    </Grid>
</Window>
using System;
using System.Windows;
using System.Windows.Controls;
namespace WpfTutorialSamples.Common_interface_controls
{
public partial class ContextMenuManuallyInvokedSample : Window
{
public ContextMenuManuallyInvokedSample()
{
InitializeComponent();
}
private void Button_Click(object sender, RoutedEventArgs e)
{
ContextMenu cm = this.FindResource("cmButton") as ContextMenu;
cm.PlacementTarget = sender as Button;
cm.IsOpen = true;
}
}
}
먼저 ContextMenu 를 버튼에서 다른 위치로 이동했습니다. 대신 창 내의 모든 위치에서 사용할 수 있도록 창의 리소스로 추가했습니다. 이것은 우리가 그것을 보여줘야 할 때 훨씬 더 쉽게 찾을 수 있게 해줍니다.
이제 버튼에 클릭 이벤트 핸들러가 있으며, 이 핸들러는 Code-behind에서 처리합니다. 여기서 창 리소스에서 ContextMenu 인스턴스를 찾은 다음 두 가지 작업을 수행합니다. WPF에서 어떤 요소를 기준으로 위치를 계산해야 하는지 알려주는 PlacementTarget 속성을 설정한 다음 IsOpen을 true로 설정하여 메뉴를 엽니다. 당신이 해야 할 건 이게 전부입니다!