This article is currently in the process of being translated into Korean (~95% done).
Creating & using a UserControl
UserControl 클래스로 표시되는 WPF의 사용자 컨트롤은 마크 업과 코드를 재사용 가능한 컨테이너로 그룹화하여 동일한 기능을 가진 동일한 인터페이스를 여러 장소에서 여러 응용 프로그램에서 사용할 수 있도록하는 개념입니다.
사용자 컨트롤은 다른 컨트롤을 배치 할 수 있는 영역인 WPF Window와 같은 역할을하며 이러한 컨트롤과 상호 작용할 수 있는 코드 숨김 파일과 같은 역할을 합니다. 사용자 정의 컨트롤이 포함 된 파일도 .xaml로 끝나고 코드 숨김은 .xaml.cs로 끝납니다 - Window처럼. 시작 마크 업은 약간 다르게 보입니다:
<UserControl x:Class="WpfTutorialSamples.User_Controls.LimitedInputUserControl"
         xmlns="http://schemas.microsoft.com/winfx/2006/xaml/presentation"
         xmlns:x="http://schemas.microsoft.com/winfx/2006/xaml"
         xmlns:mc="http://schemas.openxmlformats.org/markup-compatibility/2006"
         xmlns:d="http://schemas.microsoft.com/expression/blend/2008"
         mc:Ignorable="d"
         d:DesignHeight="300" d:DesignWidth="300">
    <Grid>

    </Grid>
</UserControl>
그러나 너무 이상한 것은 없습니다 - Window 요소 대신 루트 UserControl 요소와 디자인 타임에 사용자 컨트롤의 크기를 제어하는 DesignHeight 및 DesignWidth 속성 (런타임에서 크기는 사용자 컨트롤). 코드 숨김에서 Window 대신 UserControl 을 상속하는 것과 동일한 것을 알 수 있습니다.
User Control의 생성
이 스크린 샷과 같이 추가하려는 프로젝트 또는 폴더 이름을 마우스 오른쪽 버튼으로 클릭하여 다른 창을 추가하는 것처럼 프로젝트에 사용자 정의 컨트롤을 추가하십시오 (사용 중인 Visual Studio 버전에 따라 약간 다르게 보일 수 있음 ) :

이 내용에서는 TextBox의 텍스트 양을 특정 문자 수로 제한하고 사용자에게 사용 된 문자 수와 총 수를 표시하는 유용한 User 컨트롤을 작성합니다. 이것은 매우 간단하며 트위터와 같은 많은 웹 애플리케이션에서 사용됩니다. 이 기능을 일반 Window에 추가하는 것은 쉽지만 응용 프로그램의 여러 곳에서 수행하는 것이 유용 할 수 있으므로 쉽게 재사용 할 수있는 UserControl로 래핑하는 것이 좋습니다.
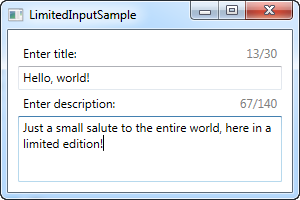
코드를 살펴보기 전에 다음과 같은 최종 결과를 살펴 보겠습니다:

다음은 사용자 컨트롤 자체의 코드입니다:
<UserControl x:Class="WpfTutorialSamples.User_Controls.LimitedInputUserControl"
         xmlns="http://schemas.microsoft.com/winfx/2006/xaml/presentation"
         xmlns:x="http://schemas.microsoft.com/winfx/2006/xaml"
         xmlns:mc="http://schemas.openxmlformats.org/markup-compatibility/2006"
         xmlns:d="http://schemas.microsoft.com/expression/blend/2008"
         mc:Ignorable="d"
         d:DesignHeight="300" d:DesignWidth="300">
    <Grid>
    <Grid.RowDefinitions>
        <RowDefinition Height="Auto" />
        <RowDefinition Height="*" />
    </Grid.RowDefinitions>
    <Grid.ColumnDefinitions>
        <ColumnDefinition Width="*" />
        <ColumnDefinition Width="Auto" />
    </Grid.ColumnDefinitions>
    <Label Content="{Binding Title}" />
    <Label Grid.Column="1">
        <StackPanel Orientation="Horizontal">
        <TextBlock Text="{Binding ElementName=txtLimitedInput, Path=Text.Length}" />
        <TextBlock Text="/" />
        <TextBlock Text="{Binding MaxLength}" />
        </StackPanel>
    </Label>
    <TextBox MaxLength="{Binding MaxLength}" Grid.Row="1" Grid.ColumnSpan="2" Name="txtLimitedInput" ScrollViewer.VerticalScrollBarVisibility="Auto" TextWrapping="Wrap" />
    </Grid>
</UserControl>
using System;
using System.Windows.Controls;
namespace WpfTutorialSamples.User_Controls
{
public partial class LimitedInputUserControl : UserControl
{
public LimitedInputUserControl()
{
InitializeComponent();
this.DataContext = this;
}
public string Title { get; set; }
public int MaxLength { get; set; }
}
}마크 업은 매우 간단합니다. 두 개의 열과 두 개의 행이 있는 그리드입니다. 그리드의 상단에는 두 개의 레이블이 있습니다. 하나는 제목을 나타내고 다른 하나는 통계를 나타냅니다. 각각은 필요한 모든 정보에 대해 데이터 바인딩을 사용합니다. Title 및 MaxLength는 코드 숨김 속성에서 가져옵니다. 이 속성은 일반 클래스의 일반 속성으로 정의되었습니다.
현재 문자 수는 TextBox 컨트롤에서 Text.Length 속성에 직접 바인딩하여 가져옵니다.이 컨트롤은 사용자 컨트롤의 아래쪽을 사용합니다. 결과는 위의 스크린 샷에서 볼 수 있습니다. 이러한 모든 바인딩으로 인해 레이블을 업데이트하거나 TextBox에서 MaxLength 속성을 설정하는 데 C# 코드가 필요하지 않습니다. 대신 속성에 직접 바인딩하면 됩니다.
User Control의 사용
상단에 있는 코드를 사용하여 우리의 Window에 그냥 쓰면(사용하면)됩니다. Window의 XAML 코드의 맨위에 UserControl이 있는 네임스페이스에 대한 참조를 추가하여 사용합니다.
xmlns:uc="clr-namespace:WpfTutorialSamples.User_Controls"그런 다음, 우리는 uc 접두사를 붙임으로써 우리의 윈도우에 다른 WPF 컨트롤 처럼 컨트롤을 추가할수 있습니다 :
<uc:LimitedInputUserControl Title="Enter title:" MaxLength="30" Height="50" />XAML에 직집적으로 Title과 MaxLength 프로퍼티를 사용하는 것을 확인할 수 있습니다. 여기 윈도우의 전체 샘플 코드가 있습니다:
<Window x:Class="WpfTutorialSamples.User_Controls.LimitedInputSample"
    xmlns="http://schemas.microsoft.com/winfx/2006/xaml/presentation"
    xmlns:x="http://schemas.microsoft.com/winfx/2006/xaml"
    xmlns:uc="clr-namespace:WpfTutorialSamples.User_Controls"
    Title="LimitedInputSample" Height="200" Width="300">
    <Grid Margin="10">
    <Grid.RowDefinitions>
        <RowDefinition Height="Auto" />
        <RowDefinition Height="*" />
    </Grid.RowDefinitions>

    <uc:LimitedInputUserControl Title="Enter title:" MaxLength="30" Height="50" />
    <uc:LimitedInputUserControl Title="Enter description:" MaxLength="140" Grid.Row="1" />

    </Grid>
</Window>
이를 통해 제한된 텍스트 입력 컨트롤을 두 번 사용하는 해당 예제에서 설명한 것처럼 한 줄의 코드에서해당 전체 기능을 재사용 할 수 있습니다. 이미 표시된대로 최종 결과는 다음과 같습니다.

요약
유저컨트롤에 흔히 사용하는 인터페이스와 기능을 배치하는 것을 강력히 추천하며, 위에 예에서 볼 수 있듯이 이것들은 만들거나 사용하기에 매우 쉽습니다.