This article is currently in the process of being translated into Dutch (~47% done).
Reageren op wijzigingen
Tot zover in deze tutorial hebben we meestal bindings gemaakt tussen UI elementen en bestaande klassen, maar in 'real life' applicaties, zul je ongetwijfeld koppelen met je eigen data objecten. Dit is net zo gemakkelijk, maar wanneer je daar eenmaal mee start, zul je waarschijnlijk iets ontdekken dat je zal teleurstellen: wijzigingen worden niet automatisch gereflecteerd, zoals ze wel werden in de vorige voorbeelden. Zoals je in dit artikel zult leren, moet je iets meer werk doen om dit te laten gebeuren, maar gelukkig maakt WPF dit heel gemakkelijk.
Reageren op wijzigingen in de data bron
Er zijn twee verschillende scenario's die je al dan niet wenst toe te passen wanneer omgegaan moet worden met wijzigingen in de data bron: wijzigingen in de lijst van items en wijzigingen in de verbonden eigenschappen in elk van de data objecten. Hoe hier mee om te gaan is verschillend, afhankelijk van wat je aan het doen bent en wat je wenst te bereiken, maar WPF heeft twee hele gemakkelijke oplossingen die je kunt gebruiken: de ObservableCollection en de INotifyPropertyChanged interface.
Het volgende voorbeeld laat je zien waarom we deze twee dingen nodig hebben:
<Window x:Class="WpfTutorialSamples.DataBinding.ChangeNotificationSample"
        xmlns="http://schemas.microsoft.com/winfx/2006/xaml/presentation"
        xmlns:x="http://schemas.microsoft.com/winfx/2006/xaml"
        Title="ChangeNotificationSample" Height="150" Width="300">
	<DockPanel Margin="10">
		<StackPanel DockPanel.Dock="Right" Margin="10,0,0,0">
			<Button Name="btnAddUser" Click="btnAddUser_Click">Add user</Button>
			<Button Name="btnChangeUser" Click="btnChangeUser_Click" Margin="0,5">Change user</Button>
			<Button Name="btnDeleteUser" Click="btnDeleteUser_Click">Delete user</Button>
		</StackPanel>
		<ListBox Name="lbUsers" DisplayMemberPath="Name"></ListBox>
	</DockPanel>
</Window>
using System;
using System.Collections.Generic;
using System.Windows;
namespace WpfTutorialSamples.DataBinding
{
public partial class ChangeNotificationSample : Window
{
private List<User> users = new List<User>();
public ChangeNotificationSample()
{
InitializeComponent();
users.Add(new User() { Name = "John Doe" });
users.Add(new User() { Name = "Jane Doe" });
lbUsers.ItemsSource = users;
}
private void btnAddUser_Click(object sender, RoutedEventArgs e)
{
users.Add(new User() { Name = "New user" });
}
private void btnChangeUser_Click(object sender, RoutedEventArgs e)
{
if(lbUsers.SelectedItem != null)
(lbUsers.SelectedItem as User).Name = "Random Name";
}
private void btnDeleteUser_Click(object sender, RoutedEventArgs e)
{
if(lbUsers.SelectedItem != null)
users.Remove(lbUsers.SelectedItem as User);
}
}
public class User
{
public string Name { get; set; }
}
}
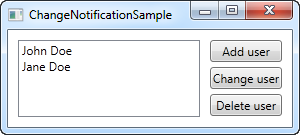
Probeer het zelf uit te voeren en neem waar dat ondanks dat je iets aan de lijst toevoegt of dat je de naam van een van de gebruikers wijzigt, niets in de UI wordt bijgewerkt. Het voorbeeld is heel eenvoudig, met een User klasse die de naam van de gebruiker bewaart, een ListBox waarin de gebruikers getoond worden en enkele opdrachtknoppen om zowel de lijst als de inhoud van de lijst te manipuleren. De ItemsSource van de lijst is toegewezen aan een snelle lijst van enkele gebruikers die we gemaakt hebben in de constructor van het venster. Het probleem is dat geen van de opdrachtknoppen lijkt te werken. Laten we dat herstellen in twee eenvoudige stappen.
Wijzigen reflecteren in de list data bron
The first step is to get the UI to respond to changes in the list source (ItemsSource), like when we add or delete a user. What we need is a list that notifies any destinations of changes to its content, and fortunately, WPF provides a type of list that will do just that. It's called ObservableCollection, and you use it much like a regular List<T>, with only a few differences.
In the final example, which you will find below, we have simply replaced the List<User> with an ObservableCollection<User> - that's all it takes! This will make the Add and Delete button work, but it won't do anything for the "Change name" button, because the change will happen on the bound data object itself and not the source list - the second step will handle that scenario though.
Reflecting changes in the data objects
The second step is to let our custom User class implement the INotifyPropertyChanged interface. By doing that, our User objects are capable of alerting the UI layer of changes to its properties. This is a bit more cumbersome than just changing the list type, like we did above, but it's still one of the simplest way to accomplish these automatic updates.
The final and working example
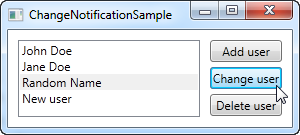
With the two changes described above, we now have an example that WILL reflect changes in the data source. It looks like this:
<Window x:Class="WpfTutorialSamples.DataBinding.ChangeNotificationSample"
        xmlns="http://schemas.microsoft.com/winfx/2006/xaml/presentation"
        xmlns:x="http://schemas.microsoft.com/winfx/2006/xaml"
        Title="ChangeNotificationSample" Height="135" Width="300">
	<DockPanel Margin="10">
		<StackPanel DockPanel.Dock="Right" Margin="10,0,0,0">
			<Button Name="btnAddUser" Click="btnAddUser_Click">Add user</Button>
			<Button Name="btnChangeUser" Click="btnChangeUser_Click" Margin="0,5">Change user</Button>
			<Button Name="btnDeleteUser" Click="btnDeleteUser_Click">Delete user</Button>
		</StackPanel>
		<ListBox Name="lbUsers" DisplayMemberPath="Name"></ListBox>
	</DockPanel>
</Window>
using System;
using System.Collections.Generic;
using System.Windows;
using System.ComponentModel;
using System.Collections.ObjectModel;
namespace WpfTutorialSamples.DataBinding
{
public partial class ChangeNotificationSample : Window
{
private ObservableCollection<User> users = new ObservableCollection<User>();
public ChangeNotificationSample()
{
InitializeComponent();
users.Add(new User() { Name = "John Doe" });
users.Add(new User() { Name = "Jane Doe" });
lbUsers.ItemsSource = users;
}
private void btnAddUser_Click(object sender, RoutedEventArgs e)
{
users.Add(new User() { Name = "New user" });
}
private void btnChangeUser_Click(object sender, RoutedEventArgs e)
{
if(lbUsers.SelectedItem != null)
(lbUsers.SelectedItem as User).Name = "Random Name";
}
private void btnDeleteUser_Click(object sender, RoutedEventArgs e)
{
if(lbUsers.SelectedItem != null)
users.Remove(lbUsers.SelectedItem as User);
}
}
public class User : INotifyPropertyChanged
{
private string name;
public string Name {
get { return this.name; }
set
{
if(this.name != value)
{
this.name = value;
this.NotifyPropertyChanged("Name");
}
}
}
public event PropertyChangedEventHandler PropertyChanged;
public void NotifyPropertyChanged(string propName)
{
if(this.PropertyChanged != null)
this.PropertyChanged(this, new PropertyChangedEventArgs(propName));
}
}
}
Samenvatting
As you can see, implementing INotifyPropertyChanged is pretty easy, but it does create a bit of extra code on your classes, and adds a bit of extra logic to your properties. This is the price you will have to pay if you want to bind to your own classes and have the changes reflected in the UI immediately. Obviously you only have to call NotifyPropertyChanged in the setter's of the properties that you bind to - the rest can remain the way they are.
The ObservableCollection on the other hand is very easy to deal with - it simply requires you to use this specific list type in those situations where you want changes to the source list reflected in a binding destination.