This article has been localized into Chinese by the community.
ListView分组
正如我们之前已经讨论的那样,WPF ListView非常灵活。分组是它开箱即用的另一个东西,它既易于使用又极易定制。让我们直接跳到第一个例子,然后我会解释它,然后我们可以使用标准的WPF技巧来进一步定制外观。
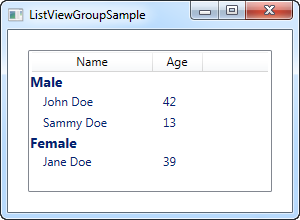
在本文中,我借用了上一篇文章中的示例代码,然后对其进行了扩展以支持分组。它看起来像这样:
<Window x:Class="WpfTutorialSamples.ListView_control.ListViewGroupSample"
        xmlns="http://schemas.microsoft.com/winfx/2006/xaml/presentation"
        xmlns:x="http://schemas.microsoft.com/winfx/2006/xaml"
        Title="ListViewGroupSample" Height="300" Width="300">
    <Grid Margin="10">
        <ListView Name="lvUsers">
            <ListView.View>
                <GridView>
                    <GridViewColumn Header="Name" Width="120" DisplayMemberBinding="{Binding Name}" />
                    <GridViewColumn Header="Age" Width="50" DisplayMemberBinding="{Binding Age}" />
                </GridView>
            </ListView.View>

            <ListView.GroupStyle>
                <GroupStyle>
                    <GroupStyle.HeaderTemplate>
                        <DataTemplate>
                            <TextBlock FontWeight="Bold" FontSize="14" Text="{Binding Name}"/>
                        </DataTemplate>
                    </GroupStyle.HeaderTemplate>
                </GroupStyle>
            </ListView.GroupStyle>
        </ListView>
    </Grid>
</Window>
using System;
using System.Collections.Generic;
using System.Windows;
using System.Windows.Data;
namespace WpfTutorialSamples.ListView_control
{
public partial class ListViewGroupSample : Window
{
public ListViewGroupSample()
{
InitializeComponent();
List<User> items = new List<User>();
items.Add(new User() { Name = "John Doe", Age = 42, Sex = SexType.Male });
items.Add(new User() { Name = "Jane Doe", Age = 39, Sex = SexType.Female });
items.Add(new User() { Name = "Sammy Doe", Age = 13, Sex = SexType.Male });
lvUsers.ItemsSource = items;
CollectionView view = (CollectionView)CollectionViewSource.GetDefaultView(lvUsers.ItemsSource);
PropertyGroupDescription groupDescription = new PropertyGroupDescription("Sex");
view.GroupDescriptions.Add(groupDescription);
}
}
public enum SexType { Male, Female };
public class User
{
public string Name { get; set; }
public int Age { get; set; }
public string Mail { get; set; }
public SexType Sex { get; set; }
}
}
在XAML中,我向ListView添加了一个GroupStyle,在其中我为每个组的标题定义了一个模板。它由一个TextBlock控件组成,我在其中使用了一个略大且粗体的文本来显示它是一个组 - 正如我们稍后将看到的,这当然可以定制得更多。 TextBlock Text属性绑定到Name属性,但请注意,这不是数据对象上的Name属性(在本例中为User类)。相反,它是由WPF分配的组的名称,基于我们用于将对象分成组的属性。
在Code-behind中,我们做的和以前一样:我们创建一个列表并向其添加一些User对象,然后我们将列表绑定到ListView - 除了我添加的新的Sex属性之外没什么新东西,告诉用户是男性还是女性。
在分配ItemsSource之后,我们使用它来获取ListView为我们创建的CollectionView。此专用View实例包含许多可能性,包括对项目进行分组的功能。我们通过向视图的GroupDescriptions添加所谓的PropertyGroupDescription来使用它。这基本上告诉WPF按数据对象的特定属性进行分组,在本例中为Sex属性。
自定义组标题
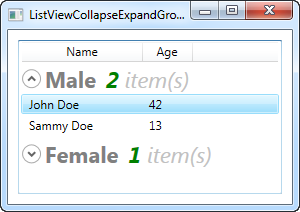
上面的例子非常适合展示ListView分组的基础知识,但外观有点无聊,所以让我们利用WPF让我们定义自己的模板并增添趣味这一事实。一个常见的请求是能够折叠和扩展组,虽然WPF默认情况下不提供此行为,但您自己实现起来有点容易。我们将通过完全重新模板化组容器来实现。
它可能看起来有点麻烦,但使用的原理有点简单,当您自定义WPF控件时,您将在其他情况下看到它们。这是代码:
<Window x:Class="WpfTutorialSamples.ListView_control.ListViewCollapseExpandGroupSample"
        xmlns="http://schemas.microsoft.com/winfx/2006/xaml/presentation"
        xmlns:x="http://schemas.microsoft.com/winfx/2006/xaml"
        Title="ListViewCollapseExpandGroupSample" Height="300" Width="300">
    <Grid Margin="10">
        <ListView Name="lvUsers">
            <ListView.View>
                <GridView>
                    <GridViewColumn Header="Name" Width="120" DisplayMemberBinding="{Binding Name}" />
                    <GridViewColumn Header="Age" Width="50" DisplayMemberBinding="{Binding Age}" />
                </GridView>
            </ListView.View>

            <ListView.GroupStyle>
                <GroupStyle>
                    <GroupStyle.ContainerStyle>
                        <Style TargetType="{x:Type GroupItem}">
                            <Setter Property="Template">
                                <Setter.Value>
                                    <ControlTemplate>
                                        <Expander IsExpanded="True">
                                            <Expander.Header>
                                                <StackPanel Orientation="Horizontal">
                                                    <TextBlock Text="{Binding Name}" FontWeight="Bold" Foreground="Gray" FontSize="22" VerticalAlignment="Bottom" />
                                                    <TextBlock Text="{Binding ItemCount}" FontSize="22" Foreground="Green" FontWeight="Bold" FontStyle="Italic" Margin="10,0,0,0" VerticalAlignment="Bottom" />
                                                    <TextBlock Text=" item(s)" FontSize="22" Foreground="Silver" FontStyle="Italic" VerticalAlignment="Bottom" />
                                                </StackPanel>
                                            </Expander.Header>
                                            <ItemsPresenter />
                                        </Expander>
                                    </ControlTemplate>
                                </Setter.Value>
                            </Setter>
                        </Style>
                    </GroupStyle.ContainerStyle>
                </GroupStyle>
            </ListView.GroupStyle>
        </ListView>
    </Grid>
</Window>
后台代码与第一个示例中使用的完全相同 - 向上滚动就能看到。

现在我们的分组看起来更令人兴奋,他们甚至包括一个扩展按钮,当你点击它时,它会切换组项目的可见性(这就是为什么单个女性用户在屏幕截图上看不到 - 我折叠了那个特定的组) 。通过使用组公开的ItemCount属性,我们甚至可以显示每个组当前包含的项目数。
正如你所看到的,它需要比我们习惯的更多的标记,但是这个例子也有点超出了我们通常所做的,所以这似乎是公平的。当您阅读代码时,您将很快意识到许多行只是样式和模板等常用元素。
小结
将分组添加到WPF ListView非常简单 - 您只需要一个带有HeaderTemplate的GroupStyle,告诉ListView如何呈现一个组,以及几行Code-behind代码来告诉WPF要分组的属性。正如您在上一个示例中所看到的,该组甚至可以自定义,允许您创建一些非常酷的视图,而无需太多工作。