This article has been localized into Chinese by the community.
WebBrowser控件
WPF有一个随时可用的WebBrowser控件,允许您在应用程序中托管完整的Web浏览器。 WebBrowser控件实际上只是一个围绕ActiveX版本的Internet Explorer的shell,但由于这是Windows集成的,因此您的应用程序应该可以在所有Windows机器上运行,而无需安装其他组件。
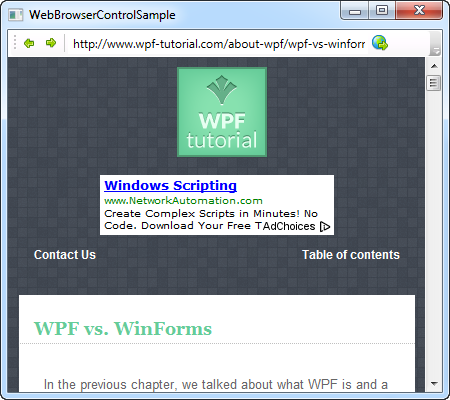
我在本文中做了一些不同的事情:我没有从一个有限的例子开始然后完善,我只创建了一个复杂的例子。 它说明了如何轻松地启动和运行小型Web浏览器。 它的功能非常基础,但如果您愿意,可以轻松扩展它。 以下是它的外观:

那么让我们来看看代码:
<Window x:Class="WpfTutorialSamples.Misc_controls.WebBrowserControlSample"
        xmlns="http://schemas.microsoft.com/winfx/2006/xaml/presentation"
        xmlns:x="http://schemas.microsoft.com/winfx/2006/xaml"
        Title="WebBrowserControlSample" Height="300" Width="450">
    <Window.CommandBindings>
        <CommandBinding Command="NavigationCommands.BrowseBack" CanExecute="BrowseBack_CanExecute" Executed="BrowseBack_Executed" />
        <CommandBinding Command="NavigationCommands.BrowseForward" CanExecute="BrowseForward_CanExecute" Executed="BrowseForward_Executed" />
        <CommandBinding Command="NavigationCommands.GoToPage" CanExecute="GoToPage_CanExecute" Executed="GoToPage_Executed" />
    </Window.CommandBindings>
    <DockPanel>
        <ToolBar DockPanel.Dock="Top">
            <Button Command="NavigationCommands.BrowseBack">
                <Image Source="/WpfTutorialSamples;component/Images/arrow_left.png" Width="16" Height="16" />
            </Button>
            <Button Command="NavigationCommands.BrowseForward">
                <Image Source="/WpfTutorialSamples;component/Images/arrow_right.png" Width="16" Height="16" />
            </Button>
            <Separator />
            <TextBox Name="txtUrl" Width="300" KeyUp="txtUrl_KeyUp" />
            <Button Command="NavigationCommands.GoToPage">
                <Image Source="/WpfTutorialSamples;component/Images/world_go.png" Width="16" Height="16" />
            </Button>
        </ToolBar>
        <WebBrowser Name="wbSample" Navigating="wbSample_Navigating"></WebBrowser>
    </DockPanel>
</Window>
using System;
using System.Windows;
using System.Windows.Input;
namespace WpfTutorialSamples.Misc_controls
{
public partial class WebBrowserControlSample : Window
{
public WebBrowserControlSample()
{
InitializeComponent();
wbSample.Navigate("http://www.wpf-tutorial.com");
}
private void txtUrl_KeyUp(object sender, KeyEventArgs e)
{
if(e.Key == Key.Enter)
wbSample.Navigate(txtUrl.Text);
}
private void wbSample_Navigating(object sender, System.Windows.Navigation.NavigatingCancelEventArgs e)
{
txtUrl.Text = e.Uri.OriginalString;
}
private void BrowseBack_CanExecute(object sender, CanExecuteRoutedEventArgs e)
{
e.CanExecute = ((wbSample != null) && (wbSample.CanGoBack));
}
private void BrowseBack_Executed(object sender, ExecutedRoutedEventArgs e)
{
wbSample.GoBack();
}
private void BrowseForward_CanExecute(object sender, CanExecuteRoutedEventArgs e)
{
e.CanExecute = ((wbSample != null) && (wbSample.CanGoForward));
}
private void BrowseForward_Executed(object sender, ExecutedRoutedEventArgs e)
{
wbSample.GoForward();
}
private void GoToPage_CanExecute(object sender, CanExecuteRoutedEventArgs e)
{
e.CanExecute = true;
}
private void GoToPage_Executed(object sender, ExecutedRoutedEventArgs e)
{
wbSample.Navigate(txtUrl.Text);
}
}
}一开始看起来代码又多又乱,但是如果仔细看看,你会发现其中有很多重复。
让我们从XAML部分开始谈论吧。 请注意,我正在使用本教程中其他地方讨论的几个概念,包括ToolBar控件和WPF命令。 ToolBar有一对按钮用于后退前进。 还有一个用于输入和显示当前URL的地址栏,以及一个用于导航到输入的URL的按钮。
在工具栏下方,是实际的WebBrowser控件。 正如您所看到的,使用它只需要一行XAML - 在这种情况下,我们订阅了Navigating事件,该事件在WebBrowser开始导航到URL时发生。
在后台代码中,我们首先导航到在Window构造函数中的URL,以便立即显示某些内容而不是空白。 然后我们有txtUrl_KeyUp事件,我们在其中检查用户是否在地址栏内按了Enter键 - 如果是,我们开始导航到输入的URL。
wbSample_Navigating事件确保每次新导航开始时地址栏都会更新。 这很重要,因为我们希望它显示当前的URL,无论用户是通过输入新的URL还是通过单击网页上的链接。
后台代码的最后一部分是对命令的简单处理:两个用于后退和前进的按钮,我们使用CanGoBack和CanGoForward来决定它们是否可以执行,以及GoBack和GoForward方法来完成实际工作。 这在处理WPF命令时非常标准,如本教程的命令部分所述。
对于最后一个命令,我们允许它始终执行,当它执行时,我们再次使用Navigate()方法。
小结
如您所见,使用WebBrowser控件可以非常轻松地在应用程序内部托管和使用完整的Web浏览器。 但是,您需要知道,与WinForms版本相比,WebBrowser的WPF版本有点受限,但基本用法和导航可以正常工作。
如果您希望使用WinForms版本,可以使用WindowsFormsHost来做,本教程的其他部分对此进行了解释。