The community is working on translating this tutorial into Slovak, but it seems that no one has started the translation process for this article yet. If you can help us, then please click "More info".
The ProgressBar control
WPF comes with a handy control for displaying progress, called the ProgressBar. It works by setting a minimum and maximum value and then incrementing a value, which will give a visual indication on how far in the process you currently are. Here's a very basic example to demonstrate it with:
<Window x:Class="WpfTutorialSamples.Misc_controls.ProgressBarSample"
        xmlns="http://schemas.microsoft.com/winfx/2006/xaml/presentation"
        xmlns:x="http://schemas.microsoft.com/winfx/2006/xaml"
        Title="ProgressBarSample" Height="100" Width="300">
    <Grid Margin="20">
        <ProgressBar Minimum="0" Maximum="100" Value="75" />
    </Grid>
</Window>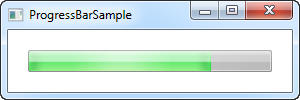
In this case, I've used a pretty standard approach of showing progress as a percentage (between 0 and 100%), giving it an initial value of 75. Another approach is to use actual minimum and maximum values from a list of tasks you're performing. For instance, if you loop through a collected list of files while checking each of them, you can set the Minimum property to 0, the Maximum to the amount of files in your list, and then just increment as you loop through it.
The ProgressBar is, just like other standard WPF controls, rendered to match the visual style of the operating system. Here on Windows 7, it has a nice animated gradient, as seen on the screenshot.
Showing progress while performing a lengthy task
The above example illustrates how simple it is to use a ProgressBar, but normally you would of course want to show the progress of some actual work and not just a static value.
In most situations you will use the ProgressBar to show progress for some heavy/lengthy task, and this this is where most new programmers run into a very common problem: If you do a piece of heavy work on the UI thread, while trying to simultaneously update e.g. a ProgressBar control, you will soon realize that you can't do both, at the same time, on the same thread. Or to be more clear, you can, but the ProgressBar won't actually show each update to the progress before the task is completed, which pretty much renders it useless.
To illustrate, you can try the following example:
<Window x:Class="WpfTutorialSamples.Misc_controls.ProgressBarTaskOnUiThread"
        xmlns="http://schemas.microsoft.com/winfx/2006/xaml/presentation"
        xmlns:x="http://schemas.microsoft.com/winfx/2006/xaml"
        Title="ProgressBarTaskOnUiThread" Height="100" Width="300"
        ContentRendered="Window_ContentRendered">
    <Grid Margin="20">
        <ProgressBar Minimum="0" Maximum="100" Name="pbStatus" />
    </Grid>
</Window>
using System;
using System.Threading;
using System.Windows;
namespace WpfTutorialSamples.Misc_controls
{
public partial class ProgressBarTaskOnUiThread : Window
{
public ProgressBarTaskOnUiThread()
{
InitializeComponent();
}
private void Window_ContentRendered(object sender, EventArgs e)
{
for(int i = 0; i < 100; i++)
{
pbStatus.Value++;
Thread.Sleep(100);
}
}
}
}A very basic example, where, as soon as the window is ready, we do a loop from 0 to 100 and in each iteration, we increment the value of the ProgressBar. Any modern computer can do this faster than you can blink your eyes, so I've added a delay to each iteration of 100 milliseconds. Unfortunately, as I already described, nothing will happen. This is how it looks in the middle of the process:
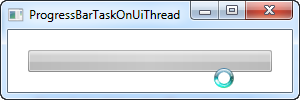
Notice that the cursor indicates that something is happening, yet the ProgressBar still looks like it did at the start (empty). As soon as the loop, which represents our lengthy task, is done, the ProgressBar will look like this:
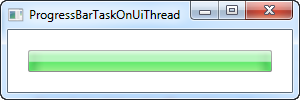
That really didn't help your users see the progress! Instead, we have to perform the task on a worker thread and then push updates to the UI thread, which will then be able to immediately process and visually show these updates. An excellent tool for handling this job is the BackgroundWorker class, which we talk much more about elsewhere in this tutorial. Here's the same example as above, but this time using a BackgroundWorker:
<Window x:Class="WpfTutorialSamples.Misc_controls.ProgressBarTaskOnWorkerThread"
        xmlns="http://schemas.microsoft.com/winfx/2006/xaml/presentation"
        xmlns:x="http://schemas.microsoft.com/winfx/2006/xaml"
        Title="ProgressBarTaskOnWorkerThread" Height="100" Width="300"
        ContentRendered="Window_ContentRendered">
    <Grid Margin="20">
        <ProgressBar Minimum="0" Maximum="100" Name="pbStatus" />
    </Grid>
</Window>
using System;
using System.ComponentModel;
using System.Threading;
using System.Windows;
namespace WpfTutorialSamples.Misc_controls
{
public partial class ProgressBarTaskOnWorkerThread : Window
{
public ProgressBarTaskOnWorkerThread()
{
InitializeComponent();
}
private void Window_ContentRendered(object sender, EventArgs e)
{
BackgroundWorker worker = new BackgroundWorker();
worker.WorkerReportsProgress = true;
worker.DoWork += worker_DoWork;
worker.ProgressChanged += worker_ProgressChanged;
worker.RunWorkerAsync();
}
void worker_DoWork(object sender, DoWorkEventArgs e)
{
for(int i = 0; i < 100; i++)
{
(sender as BackgroundWorker).ReportProgress(i);
Thread.Sleep(100);
}
}
void worker_ProgressChanged(object sender, ProgressChangedEventArgs e)
{
pbStatus.Value = e.ProgressPercentage;
}
}
}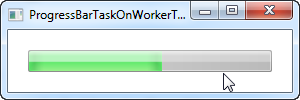
As you can see on the screenshot, the progress is now updated all the way through the task, and as the cursor indicates, no hard work is being performed on the UI thread, which means that you can still interact with the rest of the interface.
Please be aware that while the BackgroundWorker does help a lot with multithreading related problems, there are still some things you should be aware of, so please have a look at the BackgroundWorker articles in this tutorial before doing anything more advanced than a scenario like the one above.
Indeterminate
For some tasks, expressing the progress as a percentage is not possible or you simply don't know how long it will take. For those situations, the indeterminate progress bar has been invented, where an animation lets the user know that something is happening, while indicating that the running time can't be determined.
The WPF ProgressBar supports this mode through the use of the IsIndeterminate property, which we'll show you in the next example:
<Window x:Class="WpfTutorialSamples.Misc_controls.ProgressBarIndeterminateSample"
        xmlns="http://schemas.microsoft.com/winfx/2006/xaml/presentation"
        xmlns:x="http://schemas.microsoft.com/winfx/2006/xaml"
        Title="ProgressBarIndeterminateSample" Height="100" Width="300">
    <Grid Margin="20">
        <ProgressBar Minimum="0" Maximum="100" Name="pbStatus" IsIndeterminate="True" />
    </Grid>
</Window>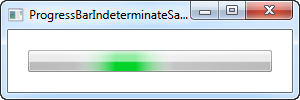
Notice that the green progress indicator is not anchored to either of the sides - instead it floats freely from start to finish and then it starts all over again.
ProgressBar with text
One thing that I really missed from the standard WPF ProgressBar is the ability to show a text representation of the progress as well as the progress bar. Fortunately for us, the flexibility of WPF makes this really easy for us to accomplish. Here's an example:
<Window x:Class="WpfTutorialSamples.Misc_controls.ProgressBarTextSample"
        xmlns="http://schemas.microsoft.com/winfx/2006/xaml/presentation"
        xmlns:x="http://schemas.microsoft.com/winfx/2006/xaml"
        Title="ProgressBarTextSample" Height="100" Width="300">
    <Grid Margin="20">
        <ProgressBar Minimum="0" Maximum="100" Value="75" Name="pbStatus" />
        <TextBlock Text="{Binding ElementName=pbStatus, Path=Value, StringFormat={}{0:0}%}" HorizontalAlignment="Center" VerticalAlignment="Center" />
    </Grid>
</Window>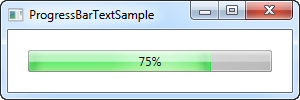
We accomplish the above by putting the ProgressBar and the TextBlock showing the percentage inside of the same Grid, without specifying any rows or columns. This will render the TextBlock on top of the ProgressBar, which is exactly what we want here, because the TextBlock has a transparent background by default.
We use a binding to make sure that the TextBlock show the same value as the ProgressBar. Notice the special StringFormat syntax, which allows us to show the value with a percentage sign postfix - it might look a bit strange, but please see the StringFormat article of this tutorial for more information on it.