This article is currently in the process of being translated into Lao (~30% done).
Hello, WPF!
ຕົວຢ່າງທໍາອິດແລະຄລາສສິກຫຼາຍໃນການຂຽນໂປຼແກຼມໃດໆກໍ່ຕາມແມ່ນ ຕົວຢ່າງ "Hello, world!", ແຕ່ໃນບົດຮຽນນີ້ພວກເຮົາຈະໄປແກ່ນແລະປ່ຽນມັນເປັນ "Hello, WPF!" ແທນ. ເປົ້າຫມາຍແມ່ນພຽງແຕ່ໄດ້ຮັບຂໍ້ຄວາມນີ້ໃສ່ຫນ້າຈໍ, ເພື່ອສະແດງໃຫ້ເຈົ້າເຫັນວ່າມັນງ່າຍທີ່ຈະເລີ່ມຕົ້ນ.
ສ່ວນທີ່ເຫຼືອຂອງບົດຮຽນນີ້ຄາດວ່າເຈົ້າໄດ້ຕິດຕັ້ງ IDE ແລ້ວ, ອາດຈະດີກ່ວາ Visual Studio ຫຼື Visual Studio Community (ເບິ່ງບົດຄວາມທີ່ຜ່ານມາສໍາລັບຄໍາແນະນໍາກ່ຽວກັບວິທີການໄດ້ຮັບມັນ). ຖ້າເຈົ້າໃຊ້ຜະລິດຕະພັນອື່ນ, ເຈົ້າຈະຕ້ອງດັດແປງຄໍາແນະນໍາໃຫ້ກັບຜະລິດຕະພັນຂອງເຈົ້າ.
ໃນ Visual Studio, ເລີ່ມຕົ້ນໂດຍການເລືອກ New project ຈາກເມນູ File. ຢູ່ເບື້ອງຊ້າຍ, ທ່ານຄວນມີກິ່ງໝວດໝູ່ເປັນ. ບົດຮຽນນີ້ຈະເນັ້ນຫນັກໃສ່ C # ເມື່ອມີ Code ທີ່ກ່ຽວຂ້ອງ, ດັ່ງນັ້ນທ່ານຄວນເລືອກເອົາຈາກລາຍຊື່ຂອງແມ່ແບບ, ແລະເນື່ອງຈາກວ່າພວກເຮົາຈະສ້າງໂປຼແກຼມ Windows ເຈົ້າຄວນເລືອກWindows ຈາກກິ່ງໝວດໝູ່. ສິ່ງນີ້ຈະໃຫ້ບັນຊີລາຍຊື່ຂອງປະເພດ Windows Application ທີ່ສາມາດເຂົ້າຫາໄດ້, ບ່ອນທີ່ທ່ານຄວນເລືອກ WPF Application. ຂ້ອຍໄດ້ຕັ້ງຊື່ Project ເປັນ "HelloWPF" ໃນຊ່ອງຂໍ້ມູນName.ໃຫ້ແນ່ໃຈວ່າສ່ວນທີ່ເຫຼືອທີ່ຢູ່ໃນສ່ວນລຸ່ມຂອງໂຕ້ຕອບແມ່ນຖືກຕ້ອງແລ້ວກົດປຸ່ມ Ok .
Project ໃຫມ່ຂອງເຈົ້າຈະມີສອງໄຟລ໌, ແຕ່ໃນຕອນນີ້ພວກເຮົາຈະມຸ່ງເນັ້ນໃສ່ພຽງແຕ່ຫນຶ່ງໃນນັ້ນ: MainWindox.xaml . ນີ້ແມ່ນ applications primary window, ຫນຶ່ງທີ່ສະແດງໃຫ້ເຫັນຄັ້ງທໍາອິດໃນເວລາທີ່ເປີດ application, ເວັ້ນເສຍແຕ່ວ່າທ່ານມີການປ່ຽນແປງໂດຍສະເພາະ. ລະຫັດ XAML ທີ່ພົບຢູ່ໃນມັນ (XAML ຖືກປຶກສາຫາລືໃນລາຍະລະອຽດໃນບົດອື່ນຂອງບົດຮຽນນີ້) ຄວນເບິ່ງຄືປະມານນີ້:
<Window x:Class="WpfApplication1.MainWindow"
    xmlns="http://schemas.microsoft.com/winfx/2006/xaml/presentation"
    xmlns:x="http://schemas.microsoft.com/winfx/2006/xaml"
    Title="MainWindow" Height="350" Width="525">
    <Grid>

    </Grid>
</Window>
This is the base XAML that Visual Studio creates for our window, all parts of it explained in the chapters on XAML and "The Window". You can actually run the application now (select Debug -> Start debugging or press F5) to see the empty window that our application currently consists of, but now it's time to get our message on the screen.
We'll do it by adding a TextBlock control to the Grid panel, with our aforementioned message as the content:
<Window x:Class="WpfApplication1.MainWindow"
    xmlns="http://schemas.microsoft.com/winfx/2006/xaml/presentation"
    xmlns:x="http://schemas.microsoft.com/winfx/2006/xaml"
    Title="MainWindow" Height="350" Width="525">
    <Grid>
        <TextBlock HorizontalAlignment="Center" VerticalAlignment="Center" FontSize="72">
            Hello, WPF!
        </TextBlock>
    </Grid>
</Window>
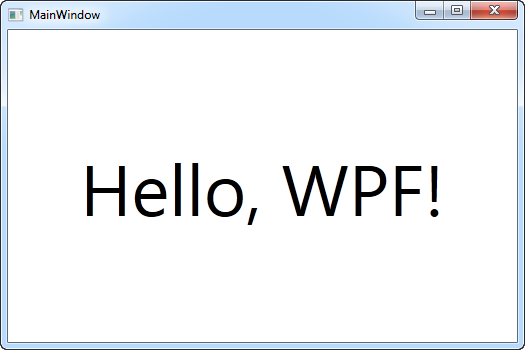
Try running the application now (select Debug -> Start debugging or press F5) and see the beautiful result of your hard work - your first WPF application:

You will notice that we used three different attributes on the TextBlock to get a custom alignment (in the middle of the window), as well the FontSize property to get bigger text. All of these concepts will be treated in later articles.
Congratulations on making it this far. Now go read the rest of the tutorial and soon you will master WPF!