This article has been localized into Hindi by the community.
The Label control
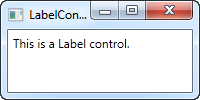
Label control अपने सबसे सरल रूप में यह बहुत कुछ TextBlock की तरह दिखता है जो कि हमने दूसरे आर्टिकल में उपयोग किया था| लेकिन आप बहुत जल्द ही देखेंगे कि Text property की जगह Label की Content property है| इसका कारण यह है कि Label text और text के आलावा किसी भी प्रकार का control अपने अंदर सीधे host कर सकता है| यह content एक string भी हो सकती है, हालांकि, जैसा कि आप इस पहले और बहुत सरल उदाहरण में देखेंगे:
<Window x:Class="WpfTutorialSamples.Basic_controls.LabelControlSample"
        xmlns="http://schemas.microsoft.com/winfx/2006/xaml/presentation"
        xmlns:x="http://schemas.microsoft.com/winfx/2006/xaml"
        Title="LabelControlSample" Height="100" Width="200">
    <Grid>
		<Label Content="This is a Label control." />
	</Grid>
</Window>
एक और चीज़ जो आप देख सकते हैं वह यह है कि Label में डिफ़ॉल्ट रूप थोड़ी सी padding है, जिससे text को ऊपर, बाएँ कोने से कुछ pixels (पिक्सेल) दूर render (प्रदर्शित) होता है। ऐसा TextBlock control में नहीं होता है, वहां आपको इसे खुद से सेट करना होता है|
इस तरह के सरल मामले में जहां content एक string है, Label वास्तव में अपने अंदर एक TextBlock बनाता है उसमें आपको string दिखाता है|
The Label control vs. the TextBlock control
तो आखिर एक Label का उपयोग क्यों करें? खैर, Label और TextBlock के बीच कुछ महत्वपूर्ण अंतर हैं। TextBlock केवल आपको एक text string को render(प्रदर्शित) करने की अनुमति देता है, जबकि लेबल आपको अन्य अनुमति भी देता है जैसे कि:
- एक border को लगाना
- दुसरे controls जैसे कि एक image आदि को render(प्रदर्शित) करना
- ContentTemplate property के द्वारा templated content(सामग्री) का उपयोग
- अन्य संबंधित controls पर access keys के उपयोग से focus देना|
अंतिम बिंदु वास्तव में TextBlock control कि जगह एक Label का उपयोग करने के मुख्य कारणों में से एक है। जब भी आप केवल सरल text को प्रस्तुत करना चाहते हैं, तो आपको TextBlock control का उपयोग करना चाहिए, क्योंकि यह हल्का है और ज्यादातर मामलों में Label से बेहतर प्रदर्शन करता है।
Label and Access keys (mnemonics)
विंडोज और अन्य ऑपरेटिंग सिस्टम में भी, यह आम बात है कि आप [Alt] key को दबाकर एक डायलॉग में controls एक्सेस कर सकते हैं और फिर एक character को दबा सकते हैं जो उस controls से मेल खाता है जिसे आप एक्सेस करना चाहते हैं। [Alt] कुंजी को दबाए रखने पर वो character highlight किया जाएगा जिसे दबाना है। TextBlock control ऐसा संभव नहीं है, लेकिन लेबल में संभव है, इसलिए controls के labels के लिए, Label control आमतौर पर एक सबसे अच्छा विकल्प है। आइए इसका एक वास्तविक उदाहरण देखें:
<Window x:Class="WpfTutorialSamples.Basic_controls.LabelControlSample"
        xmlns="http://schemas.microsoft.com/winfx/2006/xaml/presentation"
        xmlns:x="http://schemas.microsoft.com/winfx/2006/xaml"
        Title="LabelControlSample" Height="180" Width="250">
	<StackPanel Margin="10">
		<Label Content="_Name:" Target="{Binding ElementName=txtName}" />
		<TextBox Name="txtName" />
		<Label Content="_Mail:" Target="{Binding ElementName=txtMail}" />
		<TextBox Name="txtMail" />
	</StackPanel>
</Window>
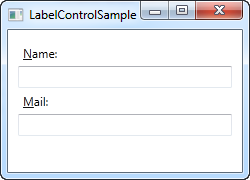
स्क्रीनशॉट हमें यह दिखता है कि Alt key को दबाने पर हमारा सैंपल डायलॉग कैसा दिखेगा। इसे Run(चलाने) का प्रयास करें, [Alt] कुंजी को दबाए रखें और फिर N और M को दबायें। आप देखेंगे कि कैसे दो textboxes के बीच focus (ध्यान) change होता है।
तो, यहाँ कई नई concepts(अवधारणाएँ) हैं। सबसे पहले, हम character से पहले एक अंडरस्कोर (_) रखकर access key को परिभाषित करते हैं। इसे पहला character होना आवश्यक नहीं है, यह आपके label content के किसी भी character से पहले हो सकता है। सामान्पयतः पहले character का उपयोग किया जाता है जो पहले से ही किसी दूसरे control के लिए एक access key के रूप में उपयोग नहीं किया गया है।
हम Label और designated control को जोड़ने के लिए Target property का उपयोग करते हैं। हम इसके लिए, ElementName property के द्वारा एक मानक WPF बाइंडिंग का उपयोग करते हैं, जिसका वर्णन हम बाद में इस ट्यूटोरियल में करेंगे। बाइंडिंग, control के नाम पर आधारित होती है, इसलिए यदि आप इस नाम को बदलते हैं, तो आपको बाइंडिंग को भी बदलना होगा।
Label content के रूप में controls का उपयोग करना
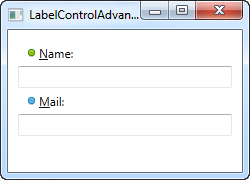
जैसा कि पहले ही बताया गया है, अन्य लाभ रखते हुए भी Label control आपको अन्य control को host(मेजबानी) करने की अनुमति देता है। आइए एक उदाहरण का देखें जहां हमारे पास लेबल के अंदर एक image और एक छोटा सा text है, और प्रत्येक Label के लिए एक access key भी है:
<Window x:Class="WpfTutorialSamples.Basic_controls.LabelControlAdvancedSample"
        xmlns="http://schemas.microsoft.com/winfx/2006/xaml/presentation"
        xmlns:x="http://schemas.microsoft.com/winfx/2006/xaml"
        Title="LabelControlAdvancedSample" Height="180" Width="250">
	<StackPanel Margin="10">
		<Label Target="{Binding ElementName=txtName}">
			<StackPanel Orientation="Horizontal">
				<Image Source="http://cdn1.iconfinder.com/data/icons/fatcow/16/bullet_green.png" />
				<AccessText Text="_Name:" />
			</StackPanel>
		</Label>
		<TextBox Name="txtName" />
		<Label Target="{Binding ElementName=txtMail}">
			<StackPanel Orientation="Horizontal">
				<Image Source="http://cdn1.iconfinder.com/data/icons/fatcow/16/bullet_blue.png" />
				<AccessText Text="_Mail:" />
			</StackPanel>
		</Label>
		<TextBox Name="txtMail" />
	</StackPanel>
</Window>
यह पिछले उदाहरण का सिर्फ एक बड़ा रूप है - एक साधारण text string के बजाय, हमारा लेबल अब एक image और एक text (AccessText control के अंदर जो हमें अभी भी लेबल के लिए एक access key का उपयोग करने की अनुमति देता है) दोनों को host(मेजबानी) करेगा। दोनों नियंत्रण एक horizontal (क्षैतिज) StackPanel के अंदर हैं, चूंकि लेबल, किसी भी अन्य ContentControl derivate (व्युत्पन्न) की तरह, केवल एक direct(प्रत्यक्ष) child control को host(मेजबानी) कर सकता है।
इस ट्यूटोरियल में बाद में बताये गये Image control, एक remote image का उपयोग करता है - यह केवल उदाहरण दिखने के लिए है और अधिकांश real life applications के लिए एक अच्छा विचार नहीं है।
सारांश (Summary)
ज्यादातर स्थितियों में, Label control वही करता है जो नाम का अर्थ है: यह किसी और control के लिए एक text label के रूप में कार्य करता है। यह इसका प्राथमिक उद्देश्य है। अधिकांश अन्य मामलों के लिए, आपको संभवतः एक TextBlock नियंत्रण या दूसरे text containers में से एक का उपयोग करना चाहिए जो WPF प्रदान करता है।