This article has been localized into Catalan by the community.
El control CheckBox
El control CheckBox permet a l'usuari final alternar una opció entre encesa o apagada. Usualment reflecteix un valor Boolean en el code-behind. Veurem l'exemple, en cas que no estiguis segur com es veu una CheckBox:
<Window x:Class="WpfTutorialSamples.Basic_controls.CheckBoxSample"
        xmlns="http://schemas.microsoft.com/winfx/2006/xaml/presentation"
        xmlns:x="http://schemas.microsoft.com/winfx/2006/xaml"
        Title="CheckBoxSample" Height="140" Width="250">
    <StackPanel Margin="10">
		<Label FontWeight="Bold">Application Options</Label>
		<CheckBox>Enable feature ABC</CheckBox>
		<CheckBox IsChecked="True">Enable feature XYZ</CheckBox>
		<CheckBox>Enable feature WWW</CheckBox>
	</StackPanel>
</Window>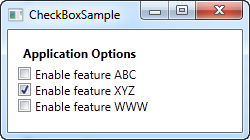
Com pots veure, el CheckBox és molt fàcil d'usar. Al segon CheckBox vaig utilitzar la propietat IsChecked per a marcar-lo per defecte, però no són necessàries més propietats per a usar-ho. La propietat IsChecked també es pot usar des del code-behind per a determinar si un CheckBox està marcat o no.
Contigut personalitzat
El control CheckBox hereta de la classe ContentControl, la qual cosa significa que pot prendre contingut personalitzat i mostrar-ho al costat d'ell. Si especifiques un tros de text, tal com vaig fer en l'exemple de dalt, WPF el posarà dins d'un control de tipus TextBlock i ho mostrarà, però això no és més que una drecera per a fer-te les coses més fàcils. Pots utilitzar qualsevol tipus de control dins d'ell, tal com veurem en el següent exemple:
<Window x:Class="WpfTutorialSamples.Basic_controls.CheckBoxSample"
        xmlns="http://schemas.microsoft.com/winfx/2006/xaml/presentation"
        xmlns:x="http://schemas.microsoft.com/winfx/2006/xaml"
        Title="CheckBoxSample" Height="140" Width="250">
    <StackPanel Margin="10">
		<Label FontWeight="Bold">Application Options</Label>
		<CheckBox>
			<TextBlock>
				Enable feature <Run Foreground="Green" FontWeight="Bold">ABC</Run>
			</TextBlock>
		</CheckBox>
		<CheckBox IsChecked="True">
			<WrapPanel>
				<TextBlock>
					Enable feature <Run FontWeight="Bold">XYZ</Run>
				</TextBlock>
				<Image Source="/WpfTutorialSamples;component/Images/question.png" Width="16" Height="16" Margin="5,0" />
			</WrapPanel>
		</CheckBox>
		<CheckBox>
			<TextBlock>
				Enable feature <Run Foreground="Blue" TextDecorations="Underline" FontWeight="Bold">WWW</Run>
			</TextBlock>
		</CheckBox>
	</StackPanel>
</Window>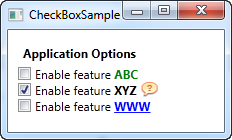
Com es pot veure del codi de prova, pots fer gairebé tot el que vulguis amb el context. En les tres Caselles de selecció faig una cosa diferent amb el text, i en el del mitjà fins incloc un control d'imatge. Especificant un control com a context, en comptes de només text, tenim molt més control sobre l'aparença, i el que té de bo això és que no importa la part del context que cliquis, aquest activarà el CheckBox i l'alternarà entre ences i apagat.
La propietat IsThreeState
Com hem dit, el CheckBox normalment es correspon amb un valor lògic, la qual cosa significa que té només dos estats: true o false (o encés i apagat). En qualsevol cas, ja que un tipus de dades booleà podria ser nullable, permetent de fet una tercera opció (true, false o null) el control CheckBox també permet aquest escenari. Posant la propietat IsThreeState a true, el CheckBox podrà adquirir el tercer estat anomenat "l'estat intermig".
Una utilització habitual per a això és disposar d'un CheckBox que "habiliti tot", que pot controlar un conjunt de CheckBox fills així com mostrar el seu estat col·lectiu. El nostre exemple mostra com podries crear una llista de característiques que poden canviar-se a enceses o apagades, amb un CheckBox comuna que les "habiliti totes" damunt.
<Window x:Class="WpfTutorialSamples.Basic_controls.CheckBoxThreeStateSample"
        xmlns="http://schemas.microsoft.com/winfx/2006/xaml/presentation"
        xmlns:x="http://schemas.microsoft.com/winfx/2006/xaml"
        Title="CheckBoxThreeStateSample" Height="170" Width="300">
	<StackPanel Margin="10">
		<Label FontWeight="Bold">Application Options</Label>
		<StackPanel Margin="10,5">
			<CheckBox IsThreeState="True" Name="cbAllFeatures" Checked="cbAllFeatures_CheckedChanged" Unchecked="cbAllFeatures_CheckedChanged">Enable all</CheckBox>
			<StackPanel Margin="20,5">
				<CheckBox Name="cbFeatureAbc" Checked="cbFeature_CheckedChanged" Unchecked="cbFeature_CheckedChanged">Enable feature ABC</CheckBox>
				<CheckBox Name="cbFeatureXyz" IsChecked="True" Checked="cbFeature_CheckedChanged" Unchecked="cbFeature_CheckedChanged">Enable feature XYZ</CheckBox>
				<CheckBox Name="cbFeatureWww" Checked="cbFeature_CheckedChanged" Unchecked="cbFeature_CheckedChanged">Enable feature WWW</CheckBox>
			</StackPanel>
		</StackPanel>
	</StackPanel>
</Window>
using System;
using System.Windows;
namespace WpfTutorialSamples.Basic_controls
{
public partial class CheckBoxThreeStateSample : Window
{
public CheckBoxThreeStateSample()
{
InitializeComponent();
}
private void cbAllFeatures_CheckedChanged(object sender, RoutedEventArgs e)
{
bool newVal = (cbAllFeatures.IsChecked == true);
cbFeatureAbc.IsChecked = newVal;
cbFeatureXyz.IsChecked = newVal;
cbFeatureWww.IsChecked = newVal;
}
private void cbFeature_CheckedChanged(object sender, RoutedEventArgs e)
{
cbAllFeatures.IsChecked = null;
if((cbFeatureAbc.IsChecked == true) && (cbFeatureXyz.IsChecked == true) && (cbFeatureWww.IsChecked == true))
cbAllFeatures.IsChecked = true;
if((cbFeatureAbc.IsChecked == false) && (cbFeatureXyz.IsChecked == false) && (cbFeatureWww.IsChecked == false))
cbAllFeatures.IsChecked = false;
}
}
}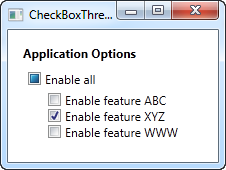
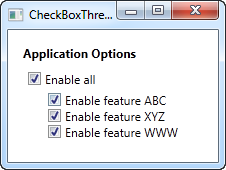
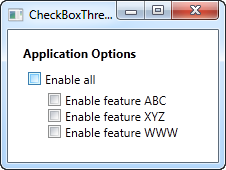
Aquest exemple funciona des de dos punts de vista diferents: si habilites o deshabilites el CheckBox "Habilitar tot", doncs tots els CheckBox fills, cadascun representant una característica de l'aplicació en el nostre exemple, estarà habilitat o deshabilitat. També funciona a l'inrevés, quan en habilitar o deshabilitar un CheckBox fill afecta a l'estat del CheckBox "Habilitar tot": si tots estan habilitats o deshabilitats, llavors "Habilitar tot" adquireix el mateix estat - d'una altra manera, el valor quedarà null, la qual cosa força a la CheckBox a l'estat intermig.
Tot aquest comportament pot veure's en les captures de pantalla a dalt, i pot aconseguir-se mitjançant una subscripció als esdeveniments Checked i Unchecked dels controls CheckBox. A exemple del món real, probablement faries un "bind" dels valors, però aquest exemple mostra els fonaments d'utilitzar la propietat IsThreeState per a crear un efecte "Habilitar tot".