This article has been localized into Chinese by the community.
A special thanks goes out to user #1699 for the Chinese translation of this article: Noctwolf
怎么做一个富文本编辑器
这是另一篇如何文章,灵感来自于RichTextBox控件的酷炫程度,以及创建一个小巧但非常强大的富文本编辑器是多么容易 - 想想Windows写字板! 虽然WPF对我们来说非常简单,但是XAML和C#代码会比平常多一些,但这没关系。 我们将逐个浏览有趣的部分,最后我将向您展示整个代码清单。
在本文中,我们将使用我们在本教程的其他部分中使用的许多控件和技术,因此解释不会太详细。 如果您需要梳理部分内容,可以随时返回完整详细的说明。
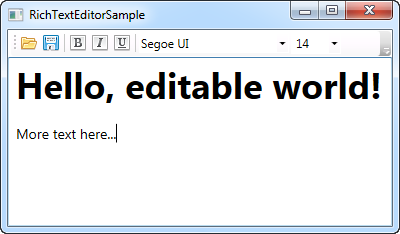
首先,让我们看看目标。 这应该是最终的样子:

界面
该界面包含一个ToolBar控件,上面有按钮和组合框。 有用于加载和保存文档的按钮,用于控制各种字体粗细和样式属性的按钮,以及用于控制字体和大小的两个组合框。
工具栏下方是RichTextBox控件,所有编辑将在其中完成。
命令
您会注意到首先是使用WPF命令,我们在本文前面已经讨论过。 我们使用ApplicationCommands类中的Open和Save命令来加载和保存文档,我们使用EditingCommands类中的ToggleBold,ToggleItalic和ToggleUnderline命令来获取相关按钮的样式。
使用命令的优势显而易见,因为RichTextBox控件已经实现了ToggleBold,ToggleItalic和ToggleUnderline命令。 这意味着我们不必为它们编写任何代码来工作。 只需将它们绑定到按钮即可:
<ToggleButton Command="EditingCommands.ToggleBold" Name="btnBold">
    <Image Source="/WpfTutorialSamples;component/Images/text_bold.png" Width="16" Height="16" />
</ToggleButton>
我们还免费获得键盘快捷键 - 按Ctrl+B激活ToggleBold,按Ctrl+I激活ToggleItalic,按Ctrl+U激活ToggleUnderline。
请注意,我使用的是ToggleButton而不是常规Button控件。 我希望按钮是可复选的,如果当前选择是粗体,通过ToggleButton的IsChecked属性支持。 不幸的是,WPF没有办法为我们处理这部分,因此我们需要一些代码来更新各种按钮和组合框的状态。 稍后会详细介绍。
Open和Save命令无法自动处理,所以我们必须像之前一样,使用Window的CommandBinding,然后使用后台代码中的事件处理程序:
<Window.CommandBindings>
    <CommandBinding Command="ApplicationCommands.Open" Executed="Open_Executed" />
    <CommandBinding Command="ApplicationCommands.Save" Executed="Save_Executed" />
</Window.CommandBindings>
我将在本文后面向您展示怎么实现。
字体和大小
为了显示和更改字体和大小,我们有几个组合框。 它们使用系统字体填充,并在窗口的构造函数中选择可能的大小,如下所示:
public RichTextEditorSample()
{
	InitializeComponent();
	cmbFontFamily.ItemsSource = Fonts.SystemFontFamilies.OrderBy(f => f.Source);
	cmbFontSize.ItemsSource = new List<double>() { 8, 9, 10, 11, 12, 14, 16, 18, 20, 22, 24, 26, 28, 36, 48, 72 };
}
再一次,WPF使我们可以通过使用SystemFontFamilies属性轻松获取可能的字体列表。 由于大小列表只是建议,我们使ComboBox控件可编辑,以便用户输入自定义大小:
<ComboBox Name="cmbFontFamily" Width="150" SelectionChanged="cmbFontFamily_SelectionChanged" />
<ComboBox Name="cmbFontSize" Width="50" IsEditable="True" TextBoxBase.TextChanged="cmbFontSize_TextChanged" />
这也意味着我们将以不同的方式处理变化。 对于字体ComboBox,我们处理SelectionChanged事件,同时我们处理字体大小ComboBox的TextBoxBase.TextChanged事件,以处理用户可以选择或手动输入大小。
WPF为我们处理Bold,Italic和Underline命令的实现,但是对于字体和大小,我们必须手动改变这些值。 幸运的是,使用ApplyPropertyValue()方法很容易实现。 上面提到的事件处理程序看起来像这样。
private void cmbFontFamily_SelectionChanged(object sender, SelectionChangedEventArgs e)
{
	if(cmbFontFamily.SelectedItem != null)
		rtbEditor.Selection.ApplyPropertyValue(Inline.FontFamilyProperty, cmbFontFamily.SelectedItem);
}

private void cmbFontSize_TextChanged(object sender, TextChangedEventArgs e)
{
	rtbEditor.Selection.ApplyPropertyValue(Inline.FontSizeProperty, cmbFontSize.Text);
}
这里没什么特别的 - 我们只是将选中/输入的值传递给ApplyPropertyValue()方法,以及我们希望改变的属性。
更新状态
如前所述,WPF为我们处理Bold,Italic和Underline命令,但我们必须手动更新对应按钮的状态,因为这不是命令功能的一部分。 但是这没关系,我们还必须更新两个组合框以反映当前的字体和大小。
我们希望在光标移动和/或选择发生变化时立即更新状态,那么RichTextBox的SelectionChanged事件可以完美做到。 以下是我们处理它的方式:
private void rtbEditor_SelectionChanged(object sender, RoutedEventArgs e)
{
	object temp = rtbEditor.Selection.GetPropertyValue(Inline.FontWeightProperty);
	btnBold.IsChecked = (temp != DependencyProperty.UnsetValue) && (temp.Equals(FontWeights.Bold));
	temp = rtbEditor.Selection.GetPropertyValue(Inline.FontStyleProperty);
	btnItalic.IsChecked = (temp != DependencyProperty.UnsetValue) && (temp.Equals(FontStyles.Italic));
	temp = rtbEditor.Selection.GetPropertyValue(Inline.TextDecorationsProperty);
	btnUnderline.IsChecked = (temp != DependencyProperty.UnsetValue) && (temp.Equals(TextDecorations.Underline));

	temp = rtbEditor.Selection.GetPropertyValue(Inline.FontFamilyProperty);
	cmbFontFamily.SelectedItem = temp;
	temp = rtbEditor.Selection.GetPropertyValue(Inline.FontSizeProperty);
	cmbFontSize.Text = temp.ToString();
}
很多行代码,但实际的工作只需要几行 - 我们只需一个小变量用来更新三个按钮,以及两个组合框。
原理很简单。 对于按钮,我们使用GetPropertyValue()方法获取给定文本属性的当前值,例如 FontWeight,然后我们更新IsChecked属性,具体取决于返回的值是否与我们要查找的值相同。
对于组合框,我们做同样的事情,但是我们不是设置IsChecked属性,而是直接用返回的值设置SelectedItem或Text属性。
加载和保存文件
处理Open和Save命令时,我们使用了非常相似的代码:
private void Open_Executed(object sender, ExecutedRoutedEventArgs e)
{
	OpenFileDialog dlg = new OpenFileDialog();
	dlg.Filter = "Rich Text Format (*.rtf)|*.rtf|All files (*.*)|*.*";
	if(dlg.ShowDialog() == true)
	{
		FileStream fileStream = new FileStream(dlg.FileName, FileMode.Open);
		TextRange range = new TextRange(rtbEditor.Document.ContentStart, rtbEditor.Document.ContentEnd);
		range.Load(fileStream, DataFormats.Rtf);
	}
}

private void Save_Executed(object sender, ExecutedRoutedEventArgs e)
{
	SaveFileDialog dlg = new SaveFileDialog();
	dlg.Filter = "Rich Text Format (*.rtf)|*.rtf|All files (*.*)|*.*";
	if(dlg.ShowDialog() == true)
	{
		FileStream fileStream = new FileStream(dlg.FileName, FileMode.Create);
		TextRange range = new TextRange(rtbEditor.Document.ContentStart, rtbEditor.Document.ContentEnd);
		range.Save(fileStream, DataFormats.Rtf);
	}
}
OpenFileDialog或SaveFileDialog用于指定位置和文件名,然后使用TextRange对象加载或保存文本,我们直接从RichTextBox获取该对象,并结合FileStream,FileStream提供对物理文件的访问。 该文件以RTF格式加载和保存,但如果您希望编辑器支持其他格式,则可以指定其他格式类型,例如纯文本。
完整的例子
这是整个应用程序的代码 - 首先是XAML,然后是C#代码:
<Window x:Class="WpfTutorialSamples.Rich_text_controls.RichTextEditorSample"
        xmlns="http://schemas.microsoft.com/winfx/2006/xaml/presentation"
        xmlns:x="http://schemas.microsoft.com/winfx/2006/xaml"
        Title="RichTextEditorSample" Height="300" Width="400">
    <Window.CommandBindings>
        <CommandBinding Command="ApplicationCommands.Open" Executed="Open_Executed" />
        <CommandBinding Command="ApplicationCommands.Save" Executed="Save_Executed" />
    </Window.CommandBindings>
    <DockPanel>
        <ToolBar DockPanel.Dock="Top">
            <Button Command="ApplicationCommands.Open">
                <Image Source="/WpfTutorialSamples;component/Images/folder.png" Width="16" Height="16" />
            </Button>
            <Button Command="ApplicationCommands.Save">
                <Image Source="/WpfTutorialSamples;component/Images/disk.png" Width="16" Height="16" />
            </Button>
            <Separator />
            <ToggleButton Command="EditingCommands.ToggleBold" Name="btnBold">
                <Image Source="/WpfTutorialSamples;component/Images/text_bold.png" Width="16" Height="16" />
            </ToggleButton>
            <ToggleButton Command="EditingCommands.ToggleItalic" Name="btnItalic">
                <Image Source="/WpfTutorialSamples;component/Images/text_italic.png" Width="16" Height="16" />
            </ToggleButton>
            <ToggleButton Command="EditingCommands.ToggleUnderline" Name="btnUnderline">
                <Image Source="/WpfTutorialSamples;component/Images/text_underline.png" Width="16" Height="16" />
            </ToggleButton>
            <Separator />
            <ComboBox Name="cmbFontFamily" Width="150" SelectionChanged="cmbFontFamily_SelectionChanged" />
            <ComboBox Name="cmbFontSize" Width="50" IsEditable="True" TextBoxBase.TextChanged="cmbFontSize_TextChanged" />
        </ToolBar>
        <RichTextBox Name="rtbEditor" SelectionChanged="rtbEditor_SelectionChanged" />
    </DockPanel>
</Window>
using System;
using System.Linq;
using System.Collections.Generic;
using System.IO;
using System.Windows;
using System.Windows.Documents;
using System.Windows.Input;
using System.Windows.Media;
using Microsoft.Win32;
using System.Windows.Controls;
namespace WpfTutorialSamples.Rich_text_controls
{
public partial class RichTextEditorSample : Window
{
public RichTextEditorSample()
{
InitializeComponent();
cmbFontFamily.ItemsSource = Fonts.SystemFontFamilies.OrderBy(f => f.Source);
cmbFontSize.ItemsSource = new List<double>() { 8, 9, 10, 11, 12, 14, 16, 18, 20, 22, 24, 26, 28, 36, 48, 72 };
}
private void rtbEditor_SelectionChanged(object sender, RoutedEventArgs e)
{
object temp = rtbEditor.Selection.GetPropertyValue(Inline.FontWeightProperty);
btnBold.IsChecked = (temp != DependencyProperty.UnsetValue) && (temp.Equals(FontWeights.Bold));
temp = rtbEditor.Selection.GetPropertyValue(Inline.FontStyleProperty);
btnItalic.IsChecked = (temp != DependencyProperty.UnsetValue) && (temp.Equals(FontStyles.Italic));
temp = rtbEditor.Selection.GetPropertyValue(Inline.TextDecorationsProperty);
btnUnderline.IsChecked = (temp != DependencyProperty.UnsetValue) && (temp.Equals(TextDecorations.Underline));
temp = rtbEditor.Selection.GetPropertyValue(Inline.FontFamilyProperty);
cmbFontFamily.SelectedItem = temp;
temp = rtbEditor.Selection.GetPropertyValue(Inline.FontSizeProperty);
cmbFontSize.Text = temp.ToString();
}
private void Open_Executed(object sender, ExecutedRoutedEventArgs e)
{
OpenFileDialog dlg = new OpenFileDialog();
dlg.Filter = "Rich Text Format (*.rtf)|*.rtf|All files (*.*)|*.*";
if(dlg.ShowDialog() == true)
{
FileStream fileStream = new FileStream(dlg.FileName, FileMode.Open);
TextRange range = new TextRange(rtbEditor.Document.ContentStart, rtbEditor.Document.ContentEnd);
range.Load(fileStream, DataFormats.Rtf);
}
}
private void Save_Executed(object sender, ExecutedRoutedEventArgs e)
{
SaveFileDialog dlg = new SaveFileDialog();
dlg.Filter = "Rich Text Format (*.rtf)|*.rtf|All files (*.*)|*.*";
if(dlg.ShowDialog() == true)
{
FileStream fileStream = new FileStream(dlg.FileName, FileMode.Create);
TextRange range = new TextRange(rtbEditor.Document.ContentStart, rtbEditor.Document.ContentEnd);
range.Save(fileStream, DataFormats.Rtf);
}
}
private void cmbFontFamily_SelectionChanged(object sender, SelectionChangedEventArgs e)
{
if(cmbFontFamily.SelectedItem != null)
rtbEditor.Selection.ApplyPropertyValue(Inline.FontFamilyProperty, cmbFontFamily.SelectedItem);
}
private void cmbFontSize_TextChanged(object sender, TextChangedEventArgs e)
{
rtbEditor.Selection.ApplyPropertyValue(Inline.FontSizeProperty, cmbFontSize.Text);
}
}
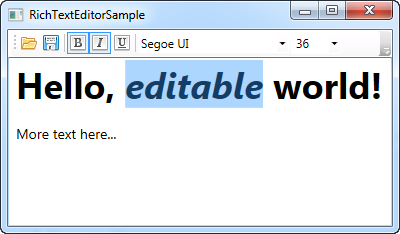
}这是我们选择了一些文本的截图。 注意工具栏控件如何反映当前选择文本的状态:

小结
如您所见,在WPF中实现富文本编辑器非常简单,特别是因为RichTextBox控件非常出色。 如果需要,可以使用文本对齐,颜色,列表甚至表格等内容轻松扩展此示例。
请注意,虽然上面的示例应该可以正常工作,但没有处理异常,以保持代码量最小化。 有几个地方可以轻松抛出异常,比如字体大小组合框,输入非数字值导致异常。 如果您希望扩展此示例以进行工作,您应该检查这些并处理可能的异常。